Saturday, November 25, 2023

I'll be home for Christmas/Scrappy Tail Crafts

Hello Friends! I happy to be back to share more Christmas inspiration for you! This Christmas card is very colorful and I was inspired by one of my favorite Christmas song "I'll be home for Christmas"... The recently released Christmas Collection is amazing! There is something for everyone! Check it out at the Scrappy Tails Shop.

PROJECT DETAILS:

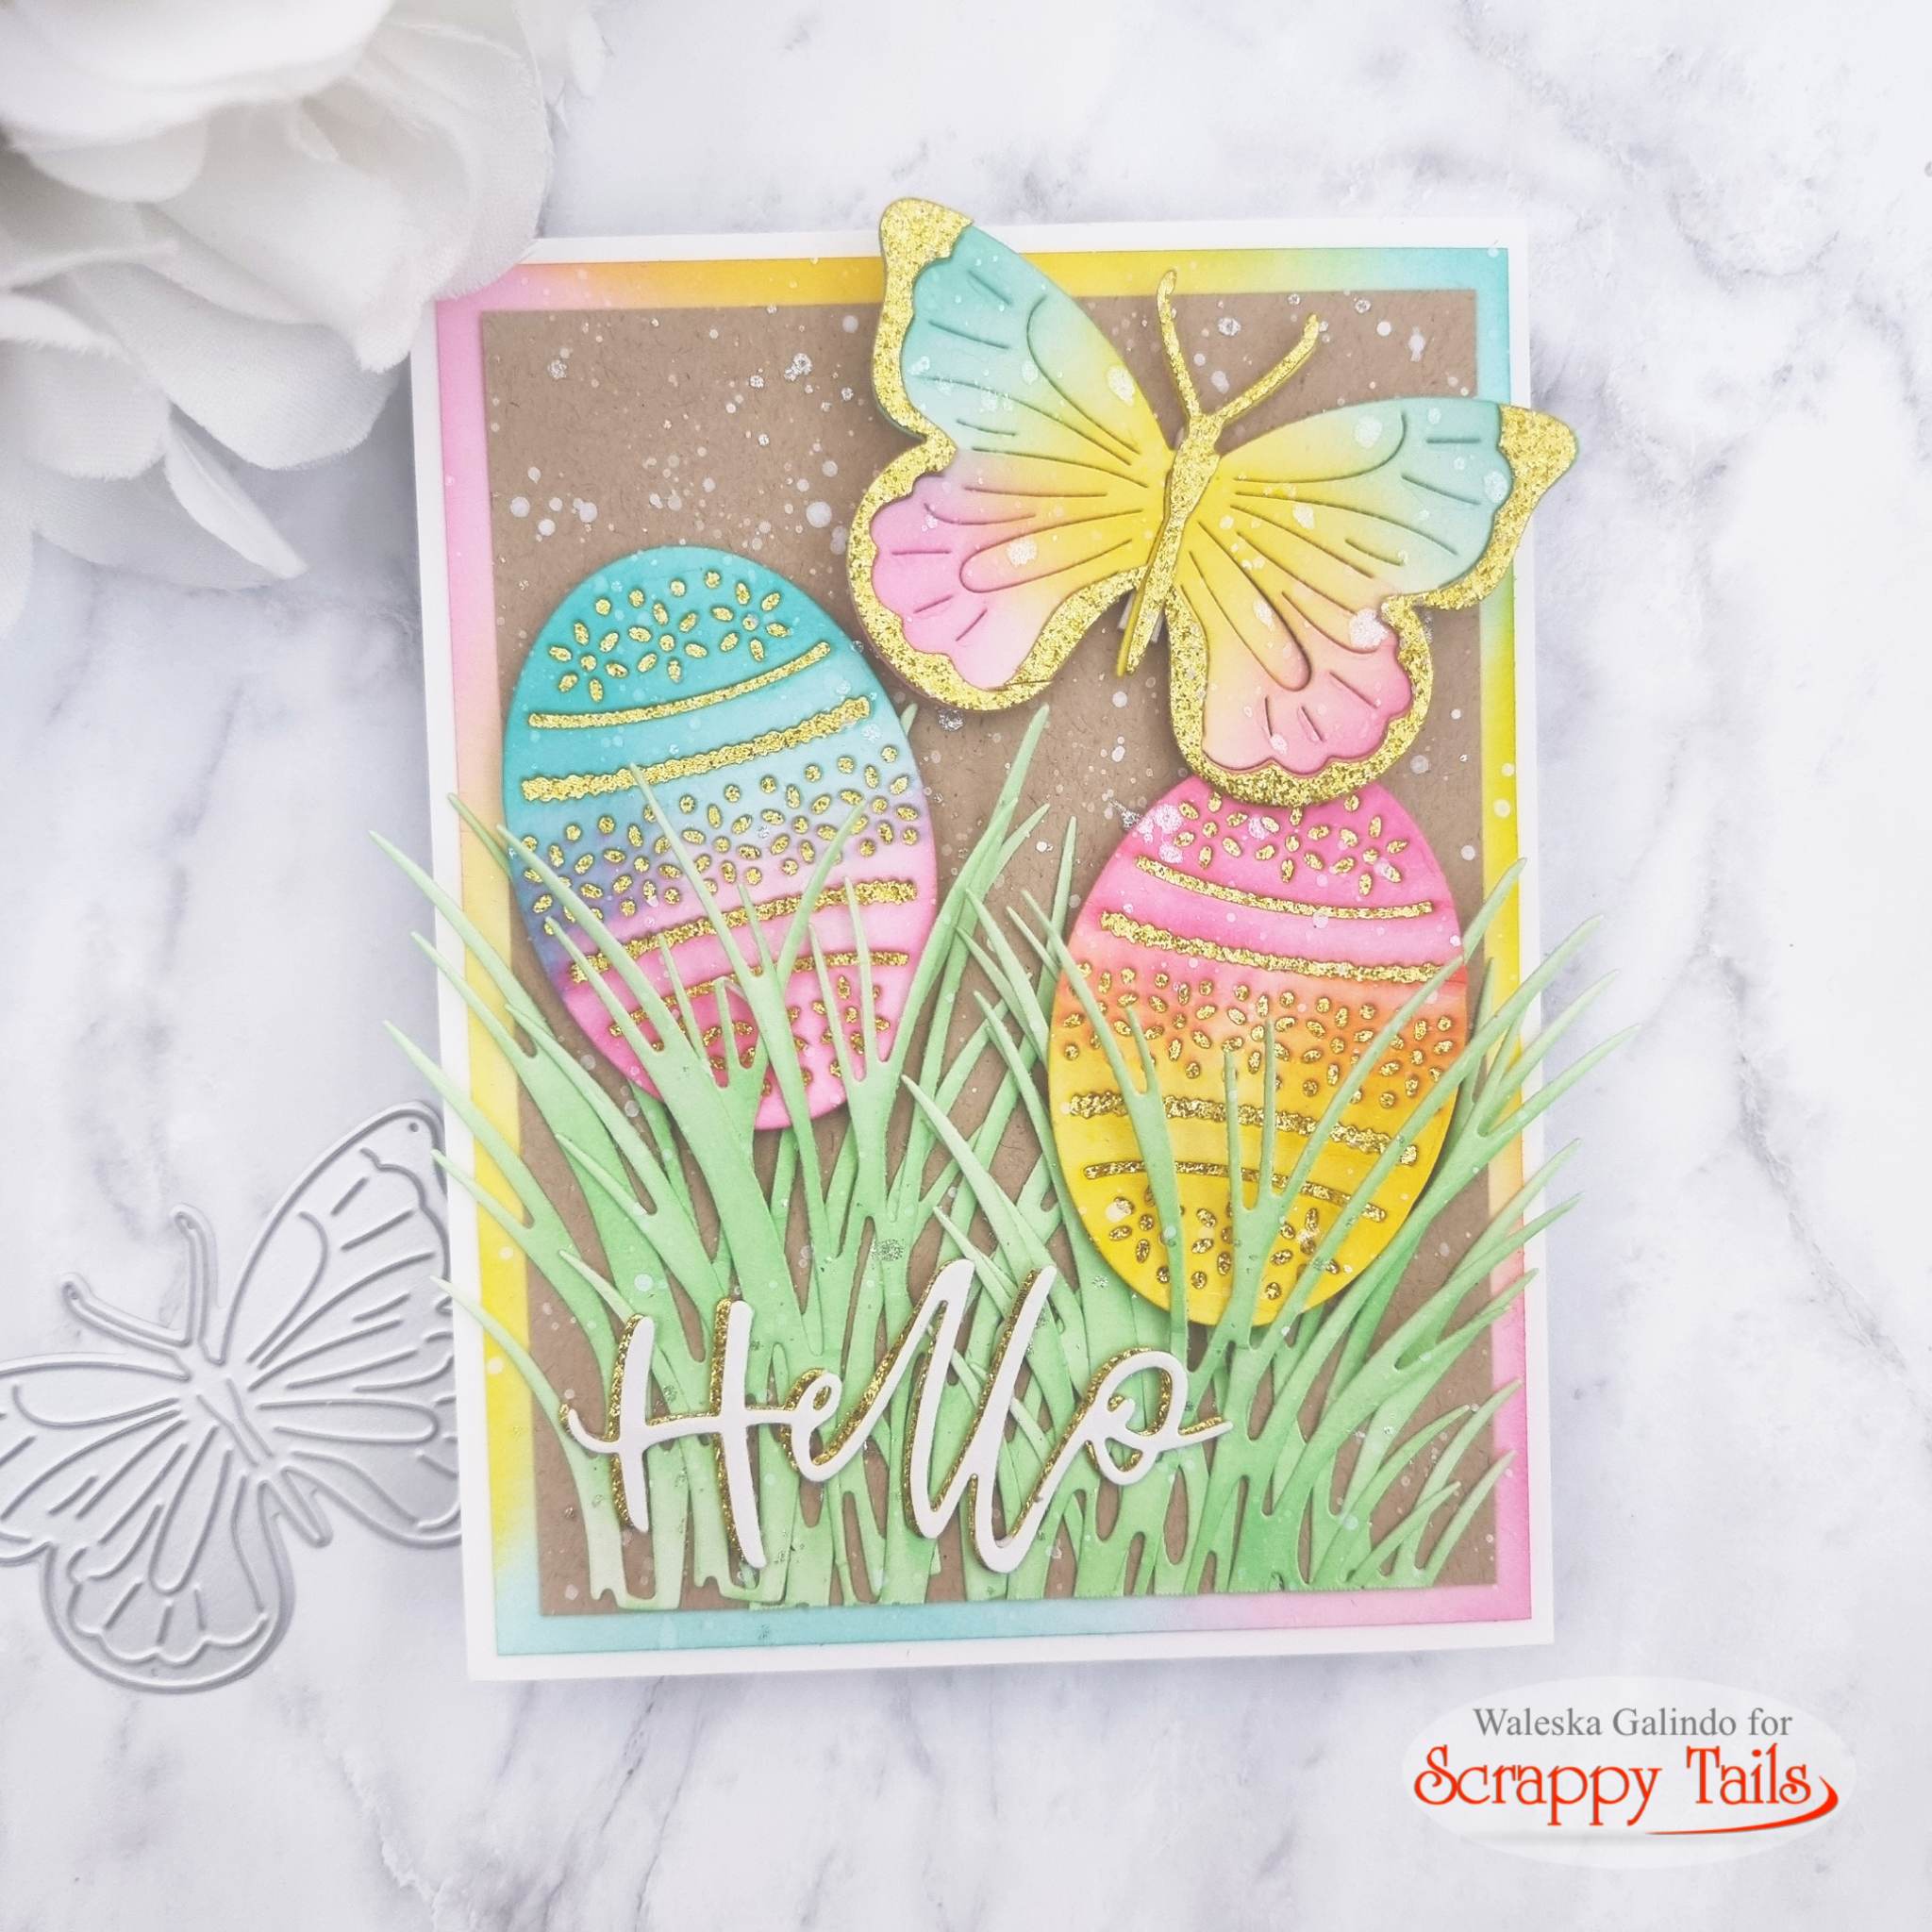
To start this card I die cut the Round Swirl Snowflake Ornament Craft Die with red and silver cardstock I added some shading with Oxide inks Lumberjack Plaid and Vintage Photo.  I then cut the Layering Christmas Bug Craft Die with a light blue cardstock and used Salty Ocean Oxide ink to shade it.  For the Christmas tree I used Rustic Wilderness Oxide for the shading.


I then cut some mat layering pieces from red and green cardstock in the same shade I used before and added the same oxide inks to create more dimension, I finally used some splashes of  sparkle watercolor to create the snowlike feel.  Such a fun scene!  I hope this inspires you to create some Christmas cards!  Have a wonderful day!


Saturday, November 11, 2023

Cute Christmas Penguin Friends/Scrappy Tail Crafts

Hello Friends! I hope your day is going great! Today I wanted to share a very colorful Christmas card... What is more adorable than two cute penguins?  This recently released Christmas Collection is amazing! There is something for everyone! Check it out at the Scrappy Tails Shop.


PROJECT DETAILS:

To start this card I die cut two penguins from the Layering Penguin Duo Craft Dies this are super easy to assemble and so so cute! I used black, white, orange and blue cardstock for the big pieces and for the small pieces I used white cardstock and colored it with copic markers.  I then cut a piece of 5 x 7 white cardstock to create the scene.  I used Oxide inks in colors Tumbled Glass and Kitsch Flamingo, I used some splashes of water and sparkle watercolors too.


I then cut the A7 Festive Garland Cover Plate from green cardstock and adhere it to the scene I already made for this two cute friends! I finally adhered the penguins and used white acrilic paint mixed with water to create the snow on the card.  I added the sentiment from the Christmas Icon Stamp Set and some snowflakes to enhance the scene!  Such a fun scene!  I hope this inspires you to create some Christmas cards!  Have a wonderful day!


Sunday, October 8, 2023

Spooky House/Scrappy Tail Crafts

Hello Friends! My favorite month is already here! Today I wanted to share a fun spooky project!  For this Halloween slimline card I used some old and new products.  Check out the new Halloween products at the Scrappy Tails Shop.


PROJECT DETAILS:

To start this slimline card I die cut the Slimline Pop Up House and I inked it with Oxide Inks in colors Fired Brick and Aged Mahogany I then cut the Slimline Brick Background die with kraft cardstock and inked it with Vintage Photo and Ground Espresso I used the same colors to inked the top of the house and the door.  I then cut the Halloween Spooky Window Lantern Panel dies and cut them to fit in the the house, I colored the images and used Vintage Photo Oxide Ink.


Finally cut the cute ghosts from the Friendly Mini Ghosts dies and adhered them all over the haunted house I also used some elements from the A7 Storefront Halloween House.  I love all the details from this Slimline card! So much Spookiness fun!
I hope this inspires you to create some spooky cute Halloween cards! Have an amazing day!


Sunday, September 24, 2023

Spooky Cute Jack O' Lantern Shaker card

Hello Friends! I hope your day is going great! Today I wanted to share a very colorful Halloween card... Who says Halloween is for dark tones? This recently released Halloween Collection is amazing! There is something for everyone! Check it out at the Scrappy Tails Shop.


PROJECT DETAILS:

To start this card I used the Wonky Spiderweb Stencil with Oxide inks in colors Carved Pumpkin, Picked Raspberry and Mustard Seed, I tried to blend this tree colors very well.  I then cut the Jack O' Lantern Pumpkin Metal Die with orange cardstock.  I then cut all the pieces to create a shaker piece in the center of his mouth, there are two options for the mouth I decided to use the Trick or Treat with white cardstock.  I also cut the top pieces and color them in brown and green.
I love all the details on this pumpkin... so spooky!


Such a fun die!  I hope this inspires you to create some spooky cute Halloween cards with the new Halloween Collection.


Sunday, August 27, 2023

Spooky Cute Party Favors/ Scrappy Tail Crafts

Hello Friends! I hope your great! Today I wanted to share the cutest Halloween favors for your halloween parties this year, this are made with the newest released Halloween Collection! I loove this collection there is something for everyone.


PROJECT DETAILS:

These are very easy to assemble and all you need is cardstock and glue.  I started with the Vampire Add On, to create him I used a light blue, purple and black cardstock for the base of this party favors I used the new Pumpkin Pop Up die, for this base I personally recommend a heavy cardstock since you will be putting candy on them.  I cut all the pieces to create him and adhere them at the front of the piece, to finish these I used the handle from the Purse Pop Up die.


For my second party favor I choose the Frankenstein Add On I did exactly the same as the other one but this time I used Green and Black cardstock, Sabrina has some amazing Videos on the Scrappy Tail Youtube Channel if you want some detailed instructions on how to assemble this.  Thank you so much for stopping by today! I hope this inspires you to create some spooky cute Halloween Party Favors with the new Halloween Collection.


Friday, August 25, 2023

Halloween Jack O' Lantern/Pixie Dust Designs

Hello Friends! I am very happy to share with you a card I created with the latest released products, they are all very beautiful.  My card today features the Pumpkin House Die but remember there are so many ways to use your dies so don't be afraid to stretch you supplies by using them in different ways! Here is my idea!


CARD DETAILS:

The pumpkin house die is for you to create a super cute house, but today I used it as a Halloween Jack O' Lantern.  I used couple of elements from other Pixie Dust Die set the Halloween Mason Jars Die Set the pumpkin face and witch hat.  I die cut all the pieces from orange, green, purple and black cardstock and to give them some fun shine I used some shimmer sprays, and for the purple background I used Oxide Ink Villanous Potion on the edges and some shimmer too.


Such a fun way to use this die! Thank you for stopping by today! have a nice rest of your day!


Spooky Witch Mirror/Scrappy Tail Crafts

Hello Friends! I hope your day is great, today I wanted to share a very fun project using the amazing just released products from Scrappy Tail Crafts, the die set I will be using today is called Scary Witch Add on and it is intended to work for the fabulous A7 Pumpkin Pop Up but for my card today I used it in a very different way just so you know there are many different ways to use this new add ons.


CARD DETAILS:

For my card today I wanted to make a spooky looking mirror, and what is scarier than an ugly witch on a mirror right?  So I first cut the mirror frame using the Fancy Rose Oval die with gold cardstock I then cut the inside of the frame with green cardstock and used Oxide Ink in color Lucky Clover on the edges, I then cut all the pieces to create the spooky witch using the Scary Witch add on and adhere the pieces to the green piece,  I finally adhere this piece to the frame and just like that you have a scary mirror! in the add on collection you can also find some spooky Draculas too that can also look very cool inside this oval.


To finish this card I cut a black cardbase and created a wallpaper looking piece with purple cardstock and finally added a spider web and the sentiment.  Such a fun card to create! Thank you so much for stopping by today! I hope this inspires you to find different ways to stretch your supplies!   


Wednesday, August 2, 2023

Cute Penguin Mug Die/Pixie Dust Designs

Hello Friends! I am very happy to share with you a fun and festive card with the new Doily Die and the Penguin Mug Die.


CARD DETAILS:

To create this card I started with the penguin mug I cut all the pieces and assemble the cute mug, this mug collection is so fun you can mix and match the different pieces on them! I cut the Doily Die from kraft cardstock and used Candied Apple Oxide ink to color the center of my card base, I then adhere all the elements and added the sentiment and some embellishments.
Such a fun card for a chilly day! Thank you for stopping by today! have a nice rest of your day!


Sunday, July 9, 2023

Set Sail Layering Pelicans Scrappy Tail Crafts

Hello Friends! Today I wanted to share with you some inspiration with the new Set Sail Release the Layering Pelicans Die, I created a fun sunset card with them.


CARD DETAILS:

To create this card I started by die cutting the pelicans with white cardstock, I then colored the different parts with copic markers, I also die cut the trunk with kraft cardstock.  I cut a 5 x 7 card base to create the scene, I used Oxide Inks in colors Wilted Violet, Seedless Preserves, Carved Pumpkin and Mustard Seed for the top of the scene and sun.  For the bottom sea part I used the same colors plus Salty Ocean I also added some water splashes for more texture.  
At the bottom of the scene I put a white cricket fence and from the Beach Essentials Die I also added a sentiment from the Guiding Light Stamp Set.


I think this release was amazing! so many great projects you can create with all the new products! Thank you for stopping by today, I hope this inspires you to create some fun Summer Cards!


Friday, June 30, 2023

Life Preserver/Scrappy Tail Crafts

 Hello Friends! Today I wanted to share with you a very easy card you can create using many of the new products from the latest release Set Sail!

CARD DETAILS:

So every time I think of sailing or nautical themes I think of white and blue horizontal stripes, for my card today I created a background using white and blue stripes on a kraft cardstock and my focal point is the super amazing A7 Life Preserver die, as you can see even though this dies are for A7 cards you can also use them on A2 cards.  


I love this new dies because of the details but they are also easy assemble.  I then stamped inside the Life Preserver one of the amazing sentiments included in the stamp set Guiding Light, I finally added some gems and this card is done!  Such a fun card to create again great masculine card but also for many other occasions! Thank you for stopping by today, I hope this inspires you to create with the new release!


Saturday, June 24, 2023

Point me in the right direction/Scrappy Tail

Hello Friends! I hope your day is great, today I wanted to share a project I created with my favorite product from the latest Scrappy Tail Crafts Release, the A7 Compass Scroll Craft Metal Die, this new die makes the most realistic compass, you can use it to create masculine cards or just some amazing cards.


CARD DETAILS:

For my card today I wanted to create a realistic looking map, I found in my stash some scrapbook paper with nautical theme with this map print so I cut the Old Paper Scroll from it, to give this piece an antique look I used Vintage Photo Oxide ink on the edges.   I then cut the compass and the old fashion feather with gold, teal and black, as I mention before this compass looks so realistic I used 3D foam tape for dimension on some parts.


I adhered the compass to the center of the map and white heat embossed a sentiment from the Guiding Light Stamp set.  I adhered this piece to an embossed piece and then to a black cardbase.  Such a fun card to create! Thank you for stopping by today, I hope this inspires you to create something today! 


Saturday, May 13, 2023

Mother's Day Butterflies Pop up Book

Hello Friends! I hope you are having a great day, today I wanted to share some inspiration for a Mother's Day 3D card with the new beautiful Butterfly Kisses Stamp and the Book Pop Up Die.


PROJECT DETAILS:

For my project I started by assembling the Pop Up Book you can watch the video on the assembling here it is very easy.  I then stamped a bunch of butterflies and colored them with markers.  I then created the backgrounds with Tonic Shimmer Powder in color Atlantis Burst and for the edges I used Oxide Ink Salty Ocean.


I finally added some golden frames in both sides of the inside of the book and glue the butterflies they look as if they were flying so beautiful.  I added the sentiment from the same stamp set too!
Thank you for stopping by today, I hope this inspires you to create something for your beautiful Mom today! 


Saturday, April 22, 2023

Spread your Wings/ Scrappy Tail Crafts

 Hello Friends! I hope your day is great, today I wanted to share with you a lovely card with the new beautiful Layering Spring Birds I love them they are very realistic and easy to assemble.

PROJECT DETAILS:

For my card today I wanted to create a realistic scene with two adorable birds.  I started by die cutting the birds with white cardstock and adding color with Oxide Inks in colors Mustard Seed and Uncharted Mariner I added some details with copic markers too.  I then die cut some greenery from the Assorted Christmas Leaves and color them with Mowed Lawn and Peeled Paint Oxide Inks.  


I adhered my scene to a light blue panel and I used the same oxide ink I used for the birds to add some color.  For the card base I used a white and kraft cardstock.  I finally added the sentiment and some watercolor splashes.
Thank you for stopping by today, I hope this inspires you to create something today! Have a great rest of your day!


Thursday, April 13, 2023

Thank you Fairy Much/ Sunny Studio Stamps

Hello Friends, with this card I wanted to thank each of you that read my blog posts and are very kind to me on social media when I share my Sunny Studio Stamps cards.  My card today features the Ribbon and Lace Border dies and the Garden Fairy Stamps.


CARD DETAILS:

To create this card I started with the color palette I wanted something soft and spring and the Spring Fever paper has some beautiful prints and colors.  I then cut some stripes with the Ribbon and Lace Border dies.  I cut an A2 size card base and used one of the scalloped borders to create a beautiful border on the front side I then used the different color stripes to create a design on the front of this panel.


I stamped two of the cute fairies from the Garden Fairy Stamps and colored them with copic markers matching the colors of the paper I already used.  I also stamped the word Thanks from the Big Bold Greetings stamps with Versafine Ink.  I adhere the fairies and word on the front of the panel and to finish my card I aded some gems to the scalloped border.
Again thank you so much for stopping by today! Remember to stay safe and crafty!


Sunday, April 9, 2023

Easter Greetings/ Scrappy Tail Crafts

Hello Friends! I hope your day is going well, today I wanted to share with you an Easter card to celebrate this beautiful day. I used the new Butterfly Kisses Card Kit from the recent release.

PROJECT DETAILS:

My project today is inspired on Easter Colors... To create this card I started die cutting all the different pieces from the Spring Essentials with white cardstock and then adding color with oxide inks Mustard Seed, Peacock Feathers, Kitsch Flamingo and Cracked Pistachio.  I used a gold glittered cardstock for the back of the eggs and some details on the butterfly wings.  I adhered all the pieces to a kraft cardstock base and added white acrilic paint mixed with water to add texture to this piece.


To finish my card I created an inked panel with the same colors I used before and finally adhered everything to a white card base.  The Hello sentiments comes along with the butterfly.
Thank you for stopping by today, I hope this inspires you to create something today! Have a great Easter Day!


Thursday, April 6, 2023

Smiley Pandas/ Sunny Studio Stamps

Hello there! I am happy to be back on the blog to share a happy card featuring the Panda Party Stamps I also used the Frilly Frames Hexagon and the Mini Mat & Tag #1 Dies.

CARD DETAILS:

I started by cutting the biggest of the Frilly Frames with white cardstock and inking another piece to adhere on top of this frame with Oxide Inks in colors Wilted Violet, Picked Raspberry, Carved Pumpkin, Mustard Seed and Cracked Pistachio, I did some watercolor splatters for more interest.  I then cut the small scalloped rectangle from the Mini Mat Tag #1 Dies and created a little scene with stencils and oxide inks.


I then stamped and cut the cutest three pandas from the set and adhere them in the scene, I stamped one of the sentiments with white embossing powder on black cardstock, such an adorable card to wish someone you love a pandastic day!
Thank you so much for stopping by today have a great rest of your week!


Thursday, March 30, 2023

Garden Bugs/Sunny Studio Stamps

Hello it is me!  Today's inspiration project features the oh so cute...Garden Critters Stamp Set mixed with the Just Bee-cause stamps I hope you like it!


CARD DETAILS:

I have to admit I am not so much of a bug kind of person but this cute little garden bugs are just too cute.
I wanted to create a scene for all this critters so I decided to use the Out on a Limb dies to create some branches for the bugs.  I used kraft cardstock and Vintage Photo Oxide ink for the branches and copic markers for the leaves.  I stamped and cut with the coordinating dies all the bugs, but I also wanted to add some bees to this scene.  I used a cloud stencils to create a cloudy background and started assembling the scene.  There were some spaces left so I stamped and cut three clouds. I finally stamped the sentiment at the bottom of the scene and add it to a pattern paper base from the Spring Fever paper pad.


So cute don't you think? I just love all this adorable friends having a good time on a spring day! Thank you for stopping by have a great day!