Wednesday, August 29, 2018

Brutus Monroe Cardstock

Hello Friends Welcome back for another Wednesday Project...using Brutus Monroe stamps and products, every Wednesday you can find a blog hop at the Brutus Monroe blog featuring a product or technique of the week!  This week will be focusing on Brutus Monoe beautiful cardstocks.


CARD DETAILS:

I love the kind of crackled look I got from heat seating the flowers on foil let me share with you how simple and easy you can get this look.  To start I used a piece of black toner sheet and I foiled the beautiful Pooltide foil, I then with embossing ink and raven embossing powder I embossed the beautiful flowers 2 times for a very dramatic look.  You have to be careful with the heat so I heated from the back and a little on top but not too close, because of the heat the foil started to crackled but not too much.


To finish this piece I used the beautiful Aubergine and Raven Brutus Monroe cardstock to create the base.  I added some gems and one of the beautiful sentiments from this Conservatory Quotes set.


I hope you like my card combining this two awesome companies, check out the ideas of the other design team members:


Brutus Monroe Supplies:

Aubergine - Cardstock - 100lb - CoverBrutus Monroe Foil Transfer Sheets 6" x 12" sheets - TIDEPOOL

Conservatory of Quotes - 4x6 StampRaven-Cardstock-100lb-Cover

Wednesday, August 22, 2018

Winnie and Walter+Brutus Monroe Collaboration

Hello Friends Welcome back for another Wednesday Project...using Brutus Monroe stamps and products, every Wednesday you can find a blog hop at the Brutus Monroe blog featuring a product or technique of the week!  This week we will be collaborating with Winnie and Walter .  Today I want to pair their awesome products with Brutus Monroe new foils, I have been obssesed with them let me show you my creation.


CARD DETAILS:

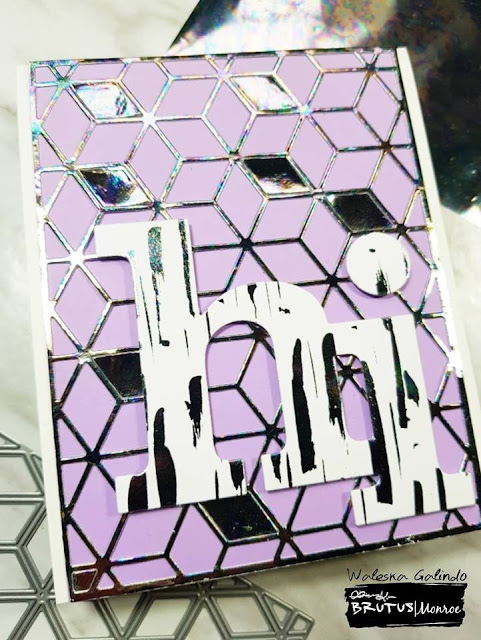
To create this card I embossed an entire piece of white cardbase with Brutus Monroe Icicle Embossing Powder and put that entire piece into my foiling machine, the embossed piece foils very well with the heat.  I run the foiled piece into my cutting machine with the Winnie and Walter Cutaway Do you see what I see, it looks beautiful with all the shine from the Tidepool Foil.


I glue the foilde piece into a lilac card base and adhere some of the leftover pieces from the diecut.  I finally added another piece I created with the transfer sheets and the same foil, this is the Winnie and Walter Hi cutaway.


I hope you like my card combining this two awesome companies, check out the ideas of the other design team members:
WALESKA (you are here)


Brutus Monroe Supplies:

Brutus Monroe Foil Transfer Sheets 6" x 12" sheets - TIDEPOOL


Saturday, August 18, 2018

Two Tone Magical Pegasus!

Hello Friends, today I have for you my second card as a guest designer for one Awesome new company called heartcraftpaper of one of my good crafty friends Monica, she is super talented and has many great digis at her shop...You can find digital stamps, digital sentiments, digital cutting files and digital paper....the new Pegasus release HERE.


CARD DETAILS:

To create this card I wanted a two tone look so I decided to use only two colors for the background and to color the digital stamps.  I started with the background I used Peachy Keen and Merman inks from Lawn fawn, I splash some water and dry it and after that I also added some gold watercolor splashes.


I cut a hill and adhere it to the front panel with 3D Foam.  I used two digis from Heartcraft Paper:  The Pegasus at Rest and The Lonely Tulip.  I resize the flowers with the silhouette cameo program to perfectly fit behind the hill.  I colored the pegasus and flowers with the same markers and adhere them to the card.


To finish this two toned card I put sequins in the same colors around the magical scene and stamped the sentiment with Versafine ink.


I hope you like another magical card with this magical collection of pegasus and you can check out this new amazing company!   Have an amazing Saturday!!!


 Heartcraft Paper Supplies:


Wednesday, August 15, 2018

DECO FOIL + STENCILS

Hello Friends Welcome back for another Wednesday Project...using Brutus Monroe stamps and products, every Wednesday you can find a blog hop at the Brutus Monroe blog featuring a product or technique of the week!,  This week we will be featuring stencils and  the  new  Brutus Monroe and Decofoil line of foils. As you already noticed this new foils are very unique and there are many ways to use them.  Today I want to pair them with one of my favorite Brutus Monroe flower stamps and transfer gel ... 


CARD DETAILS:

To start this card I created the stenciled accent with the Brutus Monroe Polka stencil, Deco Foil Transfer Gel and Sunrise Foil to a white card base.  I cut a base of Lunch Bag  cardstock and adhere it to a white card base.  I also adhere the foiled piece to the corner of the card.   To finish this card I added a stamped image of the Conservatory Quotes flower arrangement I embossed with gilded embossing powder to go along with the beautiful foil.  To unify the look of the card I put some heat to the embossed image and use a piece of left over foil to adhere foil here and there on the flowers.


I put double sided tape to the flower arrangement and adhere it to the card base and add the sentiment with the same embossing powder.


Hop along with us at the Brutuss Monroe blog and don´t miss the Design Team projects usign stencils and this new foils this week!!! Be inspired by this talented ladies:


Brutus Monroe Supplies:

Conservatory of Quotes - 4x6 Stamp

Mixed Media Stencil - Polka

Wednesday, August 8, 2018

Clear Cards/ Toner Sheets


Hello Friends welcome back for another Wednesday Project...using Brutus Monroe Stamps and products, every Wednesday you can find a Blog Hop at the Brutus Monroe Blog featuring a product or technique of the week!  This week we continue to showcase the new Brutus Monroe and Decofoil line of foils and new toner sheets.  This new line is super amazing and unique you really need to check it out!!! For my project today I am using one of the clear toner sheets called Coffee Rings that also look like bubbles.


CARD DETAILS:

To create this card I cut the Coffee Rings clear toner sheet in half to create the card base and foil it with Jade Deco Foil.  I then create another card base from white cardstock and ink it to create the water look.  I color the images with markers and adhere the foiled clear toner sheet and the white card base together, so I could have a clear flap on the front.  I adhere the merman to the foiled sheet and the fishes on the white card base.   To finish I stamped the mermaid from the same stamp set Mermaid Lagoon inside the card with Oz surface ink.


There are so many amazing projects you can do using this clear sheets, hop along with us and don´t miss the Design Team projects usign this new product this week!!! Be inspired by this talented ladies:


WALESKA (you are here)


Brutus Monroe Supplies:


Saturday, August 4, 2018

Beautiful Pegasus/New Heartcraft Paper Company

Hello Friends, today I  am a guest designer and wanted to share a card I created for one Awesome new company called heartcraftpaper of one of my good crafty friends Monica, she is super talented and has many great digis at her shop...You can find digital stamps, digital sentiments, digital cutting files and digital paper.... check her new Pegasus release HERE.


CARD DETAILS:

Ok so I loooove her new Pegasus Release, but this one is definetely my favorite, it is called Pegasus Prance.  To create this magical card I started coloring the pegasus with markers, I print many of this so I can have them ready for more cards (that is what I love about digis) I then with an embossing marker I put embossing ink on its hair and tail and added glitter embossing powder for a glittery look!!!


To create the background I used many different Oxide Ink colors, I started in the center with Peacoack Feathers and work my way out with Shaded Lilac, Seedless Preserves and the new Spun Sugar (how could I live without this color before).  I then added some water drops and with a white pigment ink and some circle stamps I created a bokeh feel to the background.


To finish the card I cut and adhere the pegasus to the background and added some small star sequins and glue this panel to a white card base.

I hope you like this magical card with this magical pegasus and you can check out this new amazing company!   Have an amazing Saturday!!!


 Heartcraft Paper Supplies:


Other things you can find at the Shop: