Showing posts with label beach. Show all posts

Sunday, July 9, 2023

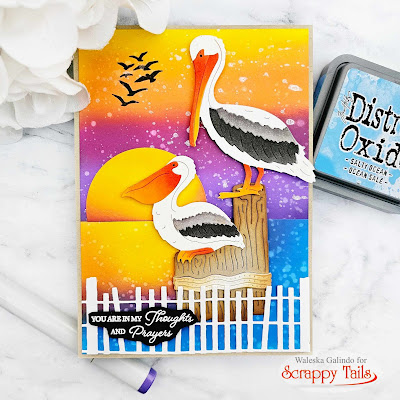
Set Sail Layering Pelicans Scrappy Tail Crafts

Hello Friends! Today I wanted to share with you some inspiration with the new Set Sail Release the Layering Pelicans Die, I created a fun sunset card with them.


CARD DETAILS:

To create this card I started by die cutting the pelicans with white cardstock, I then colored the different parts with copic markers, I also die cut the trunk with kraft cardstock.  I cut a 5 x 7 card base to create the scene, I used Oxide Inks in colors Wilted Violet, Seedless Preserves, Carved Pumpkin and Mustard Seed for the top of the scene and sun.  For the bottom sea part I used the same colors plus Salty Ocean I also added some water splashes for more texture.  
At the bottom of the scene I put a white cricket fence and from the Beach Essentials Die I also added a sentiment from the Guiding Light Stamp Set.


I think this release was amazing! so many great projects you can create with all the new products! Thank you for stopping by today, I hope this inspires you to create some fun Summer Cards!



Tuesday, May 15, 2018

Travel More Worry Less/ Pop Up Palm Tree


Hello Friends, thank you for stopping by my blog for another Wednesday Quick Tip using Brutus Monroe stamps and products, every Wednesday you can find a blog hop at the Brutus Monroe blog featuring the product of the week!!! You can find the hop HERE.   This week we have an awesome collaboration with Karen Burniston Dies... I am so happy to introduce you to this Amazing dies!!! Brutus Monroe and Karen Burniston Dies are a great mix.

CARD DETAILS:

I started with an A2 card base from Sea Brutus Monroe cardstock, for the front panel I used one of the palm trees on the Karen Burniston Palm Tree Pop Up die set.  To create the sand I used Brutus Monroe Suede Surface Spray, for the ocean I used Oz Surface Spray.  The Brutus Monroe stamp set I used is called Road Trip.  The front panel looks very normal, but the surprise comes when you open the card.... it is so awesome!!!


I promise this dies are so easy to ensemble I am sharing here some photos of how easy it is to create this pop up cards, for a detailed explanation you can find a Karen Burniston Video HERE.  For the inside card I used Suede Surface Ink to create the sand look and for the Ocean I used Oz surface spray... Surface sprays look beautiful in person and give your projects a very unique look.


I adhere one of the campers to the pop up palm tree to have it, also pop up when the card is open.  The sentiment "TRAVEL MORE WORRY LESS" was perfect for this card!!!


I hope you like my card as much as I do!!! Like the other card I shared on Monday this card was very popular among my friends and family!!! Do you want to give someone an amazing surprise!!! This dies are your way to go!!!


Now is your turn, use pop up dies to create amazing looking cards.   Remember also to join us at the Brutus Monroe Fan Club to know the latest news from Christopher and lots of inspiration from the Design Team HERE.
Stay tuned for more inspiration from the newest Brutus Monroe sets, collaborations with other companies like this time, every Wednesday at the Brutus Monroe Blog and the Design Team blogs.  

Hop along with us:

WALESKA GALINDO--- you are here

Have a nice Day!


BRUTUS MONROE SUPPLIES:


Tuesday, April 17, 2018

Kindred Stamps April Release Blog Hop featuring Family is Forever

Hello Friends, today I am super excited to introduce you to one of the new and adorable Stamp sets from the Kindred Stamps April Release:  Family is Forever... I love this little girl and friend enjoying the sun and beach that I created not one but three cards showcasing this amazing new set.


CARD #1  DETAILS:

I started creating the background for this cute friends, I almost always like to use two or three tones on my cards to have a harmonic effect.  I wanted to create a beach scene with warm tones, to do that I used oxide inks in colors, squeezed lemonade and worn lipstick.  I then stamped and color the cute girl and friend with markers.  I color the sea water with salty ocean oxide ink and some water splashes, for the palm tree and sand I used kraft cardstock  and for the palm leaves I used oxide ink cracked pistachio.


I finally added some white clouds and stamped one of the sentiments from the stamp set OHANA!! I have to say I am in love with this cute couple of friends you can use for many occasions and for many different scene cards.  I hope you can be inspired to create something amazing with the new Kindred Stamps Family is Forever stamp set.

CARD #2 DETAILS:

For my card #2 I cut a white card base and smooshed the lightest oxide ink color Squeezed Lemonade after that I also smoosed Worn Lipstick and Salty Ocean mixed with water.  I colored a bunch of tropical leaves with Cracked pistachio Oxide ink and for the flowers I used markers as well as with the cute little girl I finally stamped the word ALOHA and added some sequins.


CARD #3 Details

I again used the same colors to create a little scene, I cut an oval from the white card base to be the window and adhere it to the back of the card also with the waves.  I colored the cute little girl and friend and adhere a bunch of leaves colored again with  Cracked Pistachio.  I adhere the characters with foam tape and add a little bit of shine with sequins.


We've been changing things up this month, and we've introduced a Design Team to our group! These ladies are INCREDIBLY talented and will be with us for the next several months! We couldn't be more excited to be working with them! We also have Guest Designer Lois with us AGAIN, because we love her so much.

Please visit their blogs, and ours, and comment on all the blog posts. Doing so will make you eligible for winning shop credit! The winner will be chosen Friday evening, the night of the 20th, and will be announced in our Fan Club!


Take some time to visit the rest of blogs for more inspiration on this amazing release you will love as always!!!


Crafting Love -----You are here

Have a Nice day Friends,


Friday, August 11, 2017

Make a Splash/ Transparent Ocean with Vellum

Hello Card Making Friends Waleska today with a full beach card with the cutest Summer Critters from Neat & Tangled I am really loving this set... Which one is your favorite Summer set so far?


CARD DETAILS:

I started with the background using Distress Inks in colors Squeezed Lemonade and Carved Pumpkin.
I cut the waves with the Lawn Fawn Stitched Hillside border die in Vellum Paper and colored them with Distress Oxide ink in color Broken China. For the Sand I also used the same die in desert storm cardstock and give it a little color with Distress Ink Walnut Stain.


I stamped the cute Neat & Tangled Beach Day critters with Versafine Onyx Black ink and added Clear Embossing Powder. I color them with markers in the same color combo.


I put  Embossing Powder to one of the waves for a sparkling effect and adhere all the elements with Mono Multi Liquid Glue. I finally added the Postage Stamp Elle-ments to frame the cute scene. 


I wanted to create a water look to my card and vellum is great for that!!! I hope you like my project today and you are enjoying your summer time!


Sea you soon,

Waleska

Monday, July 17, 2017

You melt my Heart

Hello Friends It is time for another Lawn Fawnatics Challenge and I was super inspired with this one...  the colors, the photo... well so hard not to get inspired with Lawn Fawn stamps!


For this Challenge Lawn Fawn gave a color inspiration! and I loooove color inspiration to make a card because there is so much you can create, but I also was inspired by the photo inspiration and decided to create my card in the beach!


CARD DETAILS:

I created a fun scene with my favorite Oxide Ink colors Spiced Marmalade, Worn Lipstick and Broken china.  I used the cute ice cream cones from Here's the Scoop and the summer beverages from So Smooth with the color combo from the inspiration, I also die cut the smallest palm tree from the new Palm Trees Lawn Cuts to complete the beach scene.  For the waves and sand I used the Hillside Border dies. So Fun to create with Lawn Fawn I don't think I would never be tired of  Lawn Fawn products they are so Awesome at what they do! Today was the first day of their sneak peeks and I love everything!

Have a great starting week!

Waleska

Friday, June 9, 2017

Lawn Fawn Ahoy, Matey/Cute Beach Girls

Hello.... Today's card was inspired by the June beautiful Butterfly Reflections Ink Mood Board...  I loove this cute girl pirates...  I am on a Beach mood lately and I had this and many more ideas to create summer cards... It is going to be an AWESOME summer!


CARD DETAILS: I started with the sand shaker cutting a hill from Desert Storm Cardstock and with a craft knife I cut 1cm. around the inside of the hill and glue acetate to the back of the hill to create the shaker window.


For the beach background I used Oxide Inks... they blend so effortlessly that I just can't put them away.. for the sunset Fossilized Amber and Spiced Marmalade and for the ocean Faded Jeans with some water splashes.   I added the sand to the card base and add the sand cardstock piece with double sided tape to create the shaker (you have to press extra hard because the sand is more heavy than regular sequins). to glue it to the card.


I colored all the cute girl pirates matching the color combination of the mood board and die cut the great palm trees of the newest release... I glue my girls and add the sentiment with Versafine Onyx black ink.... knowing the Awesome girls I know you can make any girl happy with this one!


I hope you have a great weekend... Mine started today because my kids are home... I am rushing to write this because... you know... they were up at 6:00 a.m. today but on school days can hardly stand up at 7:00 a.m.... and right now they are calling me... MOM, MOM, MOM, MOM.... 

HUGS,

Waleska

Thursday, May 11, 2017

Nautical Cards

Hello Friends!! I have been very Nautical this days with the
new Sunny Studio Stamps release with lots of Pirates,
Mermaids and Sea animals! Today I wanted to share a set
of 3 cards I made inspired on a card I made for my sweet 
daughter Leah and of course I needed to make one for my
boy Ian too.... if not I get in trouble!!!


All this cards are 7.5 x 4.25 inches.
For the first card I used the Pirate Pals stamp set with the word
AHOY that I cut with my Silhouette Cameo, my idea was to 
create a little scene inside the "O", for the background I did 
some dark blue stripes... I added the sentiment
 "You Are a Treasure". (This was for my boy)


For my next card I used the Magical Mermaids and I wanted to 
create the feel of  the mermaids peeking on the Ship windows... 
for more details on this card you can visit the 
where I show how to create the woodgrain background.


For my last card I wanted to create a night scene with the 
Pirate Pals on the beach, I created the background with
Oxide inks in colors Faded Jeans and Broken China.

This set was so much fun to make!
I have to admit that I love this new Sunny Studio release!
Hugs,

Waleska