Tuesday, October 31, 2017

Die Cut Inserts/CDD Poinsettias


Hello Friends, Waleska from craftinglovew here to share with you a very easy way to use your dies to create backgrounds! For my card today I used the flowers that come with the Inside Scalloped Circle Dies, they have a great size, you will find 2 flowers a large and a small.  They are very versatile and you can use this design also for spring cards.


CARD DETAILS:

I started with a kraft cardstock card base that I die cut with the two flowers alternatinating the two sizes, with a pencil I marked on a white piece the edges of all the flowers to know where I needed to add color.  On the white piece I added color with Distress Ink Candid Apple and splash a little water mixed with gold watercolor.  I adhere the colored piece to the back of the flower die cut kraft cardstock for a colorful background.


To finish my card I gold embossed the edges of my card base and added gold sequins to the center of my poinsettias.  I also added the word Christmas to with gold embossing powder to finish the Christmas look.


I hope you like my card and can give this idea a try, have a wonderful day friends!


CDD Products


Monday, October 30, 2017

Spooky Halloween Decoration Card

Hello Friends Waleska from craftinglovew here, with my last post as the October Guest Designer... (sad face) I had a blast during this month sharing with you a little bit of my Halloween Card Love!!! Tomorrow is Halloween and for today's card as you already imagine I did another Halloween Card! I just can't stop, Newton's Nook stamps are so awesome!!! I hope your halloween decorations are up and you have your costume ready!!! This card was inspired on my own Halloween decorations! Every year the Halloween decoration of my fireplace is very special for all the family!


CARD DETAILS:

I started with a cream card base, I sponged the edges with Walnut Stain Distress Ink, to make the down part of the wall I used a scoreboard and score every 1/2 inch to create a wall texture and sponge it again with Walnut Stain Distress Ink to accentuate the raised lines.  I cut a strip of cardstock in the same color and adhere it to the scored panel. I stamp the spooky frame  from Creepy Cameos and the spooky skeleton with versafine ink and clear embossing powder.  I die cut a gray fireplace with a brick stencil and walnut stain distress ink I created the brick look.  I decorated the fireplace with some of the SpookySkeletons animals and I also added bats and spooky pumpkins! 


Thank you so much for stopping by and let me share with you all this Halloween cards! I hope you have an Amazing day! I am very grateful to Newton's Nook  for the opportunity to share with you my love not only for halloween cards but for Cardmaking! I send you:

Hugs, Love and a Spooktacular Halloween!!!

Trick or Treat Spooky Pumpkins

Hello Friends this is one of my last cards for this 2017 Halloween Season.  For this card I used many of the items that came on the October Brutus Monroe Inspiration Box! This box was the first box I have purchased and it was so worth it! I love everything on the box! For my card today I used the spooky pumpkin and a bunch of halloween Oxide Ink colors.


CARD DETAILS:

I started with a 3.5 x 9 card base, with post it tape I divided the front into 3 sections and colored each sections with Halloween colors!! I die cut three very spooky pumpkins with black glitter cardstock, I adhered the pumpkins to the card on the different colored sections and added the unique eyes that came on the inspiration box.  I also used the decorative embellished corners from the kit.  To finish the card I sponged with distress inks the corners for a more spooky look!!

If you don't want to miss any other Brutus Monroe Inspiration Box! Click on the link below to purchase the current box called Comfort and Joy! with this kit includes everything you need to create 35 cards with envelopes and embellishments!


Also there is a new release at the Brutus Monroe Shop with some Amazing new stamps and products check them out on the link here:


Have a great day!

Monday, October 23, 2017

Rainbow Party Newton

Hello Friends Waleska here with my Monday Blog Post as the October Guest Designer!!! I hope you have a great starting week!!  For today's card I gave halloween cards a rest and I used the Newton´s Costume Party Stamp Set for a non halloween card, I dress up Newton as a beautiful unicorn for a card ready to cheer up someone in need!!!


CARD DETAILS:

I used Oxide Inks for the background in colors Worn Lipstick, Fossilized Amber, Spiced Marmalade, Cracked Pistachio, Broken China and Wilted Violet,  I put all the colors on a Ranger Mat and I added a little water, I started smooshing a white card base beginning with the light colors until I smooshed all of the them to create a very colorful background.


I die cut the rainbow and color it with the same Oxide colors from the card base to unify the design, I stamped, cut and color three cats and adhere the unicorn horns to them.  I used 3D foam to raised the cats and cloud.  Finally I added the sentiment and clear sequins as embellishments.


The Newton´s Costume Party stamp set is so great because you can use it for many occasions! I hope you like my card and I inspire you to use this and other sets in different ways!

Have a wonderful week!


Tuesday, October 17, 2017

Bunny Kisses


Hello Friends Waleska here with my very first blog post as a Design Team Member for Brutus Monroe!!! I am so excited for this amazing opportunity!!!  I created this two cards with the beautiful Bunny Kisses stamp set, I love the drawing style of this stamp, so detailed and beautiful it reminds me of my the illustrations I find on my children's books! The possibilities are endless with this little set, not only you can make very unique and stylish baby announcements, you can also create party favors, thank you notes for a baby shower or congratulate new parents.


Yes!!! That is me!!!


CARD DETAILS:

I started with a white card base for my card, I stamped the cute family with Raven Detail Ink from Brutus Monroe, I created a mask for the bunnies, because I wanted to accentuate all the details of the image in black and white.  I used post it tape to create the color strip for the back of the bunnies with oxide inks in colors Salty Ocean and Fossilized Amber and Worn Lipstick and Cracked Pistachio with water splashes.


I stamped the sentiments and added Pretty Pink Posh clear sequins for a simple embellishment. I finally adhere the white piece to a black card base.
I hope you like this cards as much as I do, I find Brutus Monroe stamps are very unique, funky yet sophisticated.  If you haven't heard of this company please visit the shop HERE and also join us at the facebook page HERE. Christopher Alan the owner of this company is Amazing and he has unique products I know you will love!!


Have a nice week!


Monday, October 16, 2017

Scared Newton/Newton´s Nook Guest Designer

Hello Friends!!! Waleska here... and for today's card poor Newton was so scared he jumped to the wall.  Every time I make scene cards, I try to think on a special scenario and work with my images! Let me share with you how I created this one:


CARD DETAILS:

I wanted to create a scene with a spooky wall with Newton hanging because he is so scared after seeing that spooky frame or mirror.  I cut a cream cardstock for the front of my card and sponge the edges with Walnut Stain Distress Ink.  To make the down part of the wall I used a score board and score every 1/2 inch to create a wall texture and sponge it again with Walnut Stain Distress Ink to accentuate the raised lines.  I cut a strip of cardstock in the same color and adhere it to the scored panel with foam.


After I had my wall I stamped the spooky frame from Creepy Cameos with versafine ink and added clear embossing powder, for the inside part of the frame I used gray cardstock to simulate glass and stamped the creepy skull that scares Newton.  Finally I added the very frightened Newton from a non halloween set called Naughty Newton to the wall and I added the sentiment from Newtons Costume Party


I hope you like my card and I could inspire you to create and think outside box with your stamps to create fun scenes!  I hope you have a great starting week!

Top 5 Adhesive Tips!!!

Hello CDD Friends, Waleska here to share with you a fun Halloween Card and also to share with you my top 6 favorite adhesives, (I couldn't just pick 5).  If you did not know we have a new feature at the Craftin Desert Divas blog, each week the Design Team will share different tips and favorites with you, this week's topic is "Top 5 Favorite Crafty Tools".  I wanted to share with you about adhesives and the great thing is that you can find almost all of this adhesives at the Craftin Desert Divas Shop 
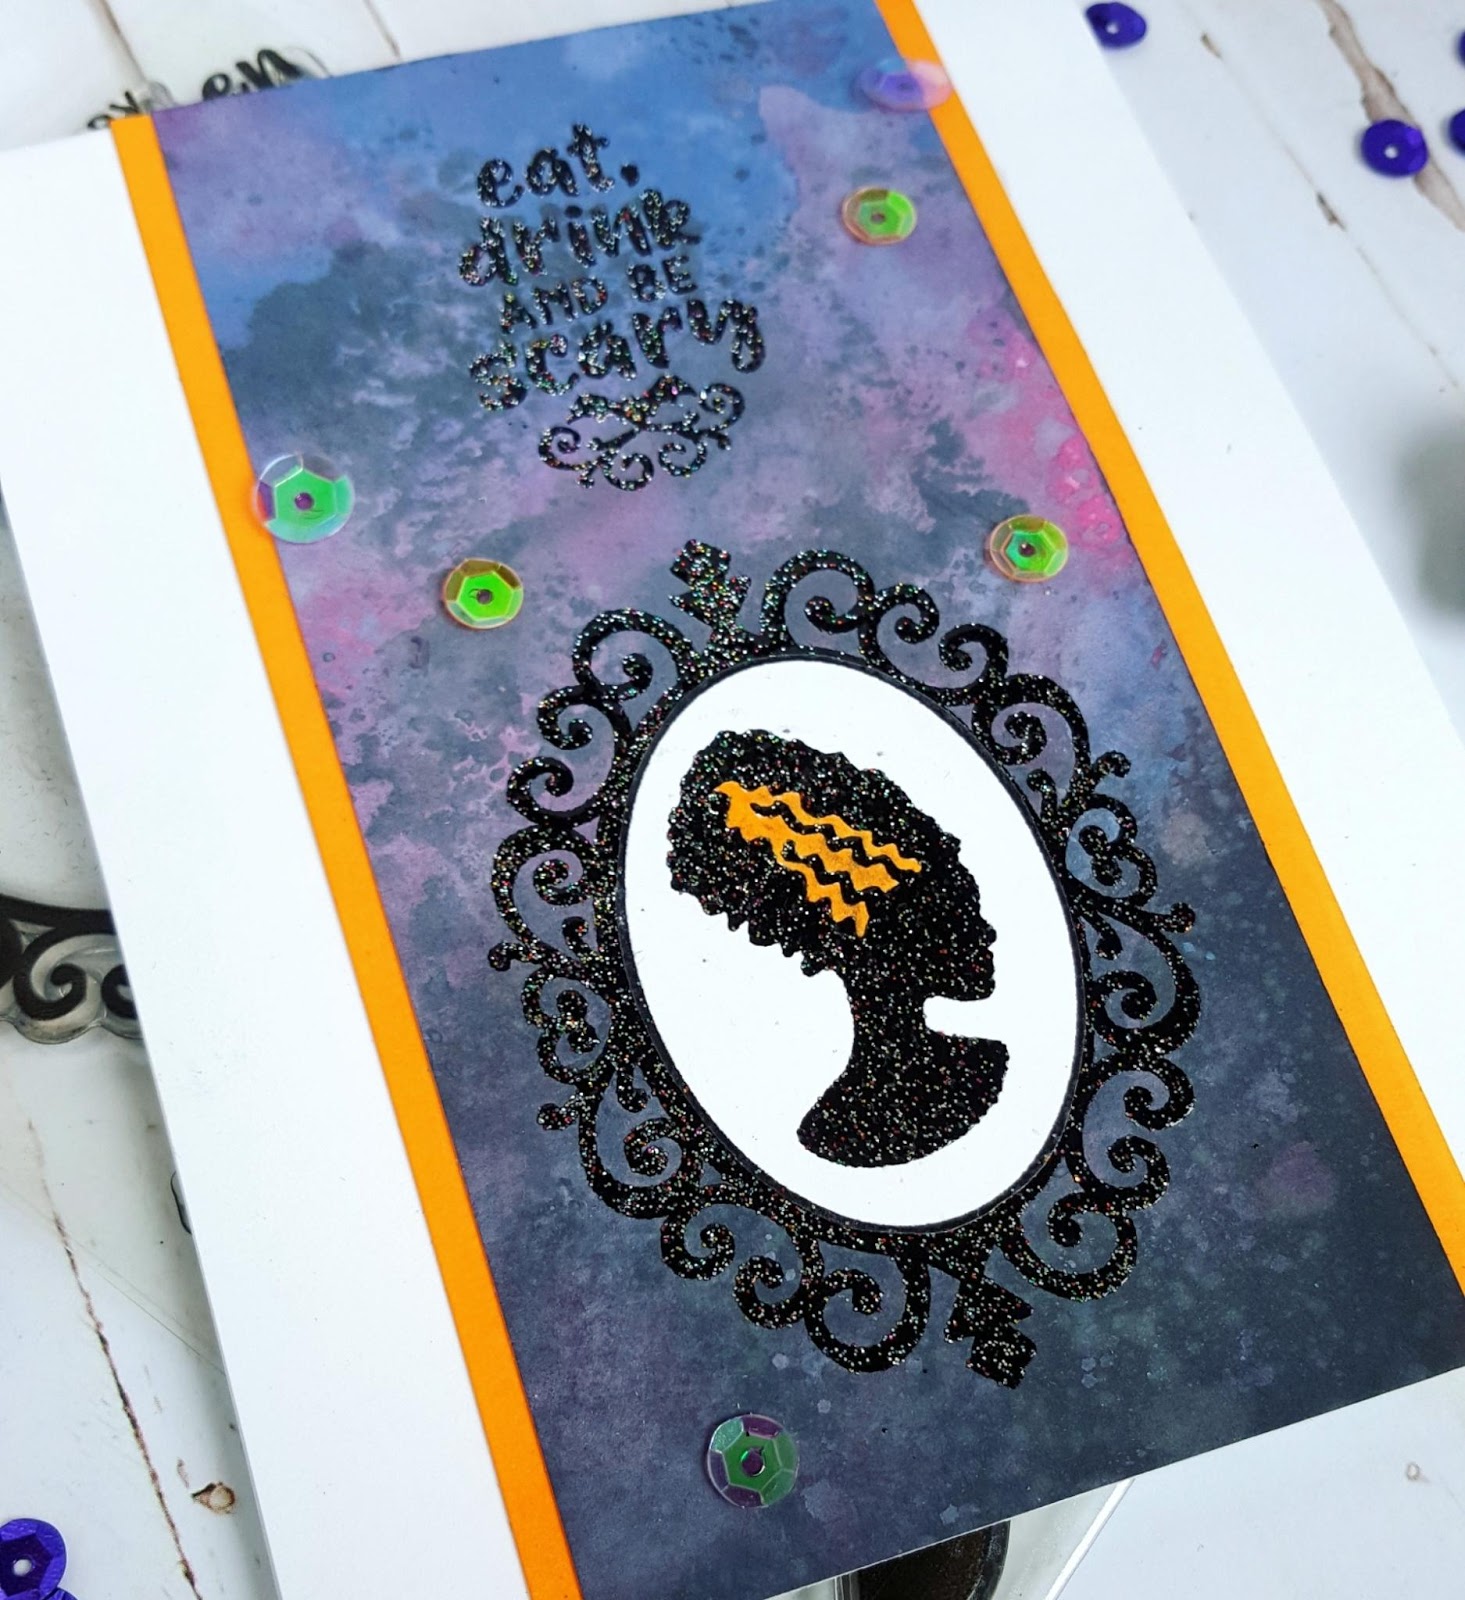
Here.   This is my card:


My favorite adhesives are: Starting from the ones I use the most, #1 the Tonic Craft Tacky Glue I use this one for almost everything I glue on my cards, I like the size and the fine tip, #2 the Tombow Mono Multi, this one is great too but I think is too sticky when I get it in my fingers and is constantly clogged so what I do is I always have a pin on hand, that is why I switched to the Tonic Craft glue, #3 Glossy Accents this glue is awesome to adhere embellishments to your cards, specially sequins I find glossy accents holds very well almost all my embellishments and it dries very quick!, #4 The Quickie Glue Pen this one is great to adhere very fine detail dies or words, #5 the Aileen's Tacky Glue this one is great for projects with kids, and finally #6 the Multi Medium Matte glue which is also great and  very strong. 


You can find almost all of this adhesives at the Craftin Desert Divas shop, so you can include them on your cart when you shop and the prize point is great!!   Now for the  card I used two distress ink colors Wilted Violet and Spiced Marmalade with water splashes.  I die cut in black cardstock the spooky border from the  Harvest Border Dies and the path from the Scene Builder Dies, I then cut the house, the trees and the tombstones so I could  glue them to the hill border following the hill curve, to glue this very thin dies I used the Quickie glue pen.


I added the moon and the cute and spooky troll from Frightfully Sweet which is ready to trick or treat in that spooky house!!! I finally add the sentiment with the Flag Banner Dies and the Fall Harvest Sequins.


I hope you find this top 6 adhesive tips helpful and you can also be inspired to create some cute and spooky Halloween cards or projects!

Have a Spooktacular Day!!!


CDD Products:


Monday, October 9, 2017

Trick or Treat Newton's Nook Guest Designer

Hello Friends, Waleska here from craftinglovew with another halloween card. (I told you I am a HUGE Halloween fan) I used our friend Newton in different costumes for a fun Trick or Treat scene.


CARD DETAILS:

For the background  of my card today I used oxide inks, and because they blend so well you can almost mix any colors beautifully.  My secret is to start with the lightest color so you don't contaminate your blending tools and get a smoother look, so I started with Spiced Marmalade Oxide Ink at the bottom and Seedless Preserves Oxide Ink for the up part.  In the middle where the two colors meet all you have to do is splash some water and it would look awesome!!! I traced and cut a hill, I sponge it with Peeled Paint Oxide Ink and adhere it to my card base to be the ground for my scene.


I glue the house silhouette and also the moon.  To  make the moon I sponge a circle die cut with Pumice Stone regular distress ink and splash some water with a distress sprayer.  To add more texture you can also sprayed  it with some shimmer.


I finally stamped and color the witch cat from the Newton´s Boo-tiful Night and the Newton from
Newton´s Costume Party and added the Mask so he can also be dressed up for halloween.  I stamped 3 bats with Versafine Onyx Black ink for a more spooky feel and added the sentiment from the Spooky Skeletons set.


I love to mix sets to create cards and Newton's Nook stamps are great to do that!!! I hope you liked my card today!  

Have a Spook-tacular Day!!

Tuesday, October 3, 2017

Eat, Drink and Be Scary


Hello, It is time for a new Inky Paws Challenge at the Newton's Nook blog this time is a color inspiration! I love it because It screams HALLOWEEN!  and I am having so much fun creating with the newer stamps.


Image may contain: text
Here is my take on this color challenge! I always like to take the colors of the challenge and only use only the inspirational colors!


CARD DETAILS:

I created the background with oxide inks Wilted Violet, Seedless Preserves and Black Soot with a smooshing technique.  That is smooshing all the colors on your craft mat add a little water and start putting all the colors on your white card base until you are ok with the mix. I cut a stripe from the background and stamped the frame and the sentiment with versafine onyx black ink, I added black sparkle embossing powder to all the black stamping. To use the orange I added some touches in the hair and I color some border stripes with the same maker color.  To finish it up I used some sequins. 


Here is a closer look to my card! I hope you like my card and can join me for my Halloween Card Series 2017 on my instagram account HERE where I will be sharing one halloween card daily until October 31st... YES that is 31 cards! I hope you have a spooktacular day!