Showing posts with label rainbow. Show all posts

Saturday, February 25, 2023

Rainbow Hand Bag/Scrappy Tail Crafts

Hello Friends! I hope your day is going well, today I wanted to share with you a rainbow bag I want in my life...💙💚💛💜 I used the A7 Purse Pop Up Craft Metal Die from the recent J'adore release.


PROJECT DETAILS:

My project today is inspired by my love for rainbows... I created fun hand bag using a rainbow paper and the beautiful A7 Purse Pop Up Craft Metal Die.  I have to say it was so much fun to create this hand bag all the little details make each bag different.  You can watch a video in the Scrappy Tail Crafts YouTube on how to assemble this fun die. I used white and silver cardstock and some gems to create this project too.


Thank you for stopping by today, I hope this inspires you to create lots of this fun handbags!  Have a great day!


Wednesday, March 16, 2022

Rainbow Macaroons

Hello Friends, Waleska here with a super fun rainbow slimline card, with the new and so yummy dessert, cookie,macaroon and donut metal craft dies this unique and  fun dies make the most beautiful food cards.  I hope you like them as much as I do.


CARD DETAILS:

I started by cutting all the pieces you need to create the macaroons with white cardstock, for this  pieces I like to use thick cardstock.  I used markers to color this macaroons with all the tones of the rainbow I also used a white gelly roll marker to make some details on each of the macaroons.  I adhere all the pieces and did some shading with a light grey marker in the middle too. 


After that I did the background with oxide inks in colors Kitsch Flamingo, Candied Apple, Carved Pumpkin, Mustard Seed, Mowed Lawn, Salty Ocean, Wilted Violet I splash some water and adhere all the macaroons and added the sentiment at the bottom.

I hope you have an amazing day! Thank you so much for stopping by today and remember that this and other amazing products you can find at the shop!


Waleska Galindo


Thursday, January 27, 2022

Intertwined Rainbow Hearts Slimline with Kat Scrappiness Dies

Hello Friends Waleska Galindo here, today I wanted to share a very colorful card using the Intertwined hearts Die.  This beautiful die can be used in many different ways specially for shaker cards but today I used it on a different way, I hope you like it and can be inspired by it.

CARD DETAILS:

To start my card I die cut the intertwined hearts three times with white cardtock and adhere them together to create dimention.  I then inked the inside parts of the hearts with rainbow oxide ink colors: Candid Apple, Carved Pumpkin, Lucky Clover, Salty Ocean, Wilted Violet and Kitsch Flamingo.  They look beautiful!! I then splash some water and some sparkle watercolor.

I cut the back of this die and adhere everything together.  I cut a Slimline panel of the Stitched Scalloped Nesting Slimline die and used the same colors of the hearts on this panel.  I cut a card base and add this panel. 


Finally I added some Sparkling Clear Jewels around the hearts and added the sentimet. I love how this card turned out!  Remember you can find this and many other amazing products at the shop.  Have a lovely day!


Waleska Galindo

Saturday, September 11, 2021

Rainbow Flowers Scrappy Tail Crafts

 Hello Friends Waleska Galindo here! I hope your day is going great!  Today I wanted to share a slimline card I created with the Whimsical Layering Daisies Die... can I just say I am obssesed with this die!!! it makes the most fun and whimsical flowers!  This time I made some rainbow colored flowers, I hope you like my card and can be inspired by it!

CARD DETAILS:  I started by diecutting six flowers from one of the many different flowers that come on this set with white cardstock.  I then used some small brushes to put color on each of the flowers starting from the center, I always try to leave some white parts to make them look more interesting.  I then cut the center of the flowers and colored them with  Y00 copic marker I added Chunky Glitter on each of the centers too.

I then cut the stems with white cardstock and with a green marker I colored them.  I cut a black panel of cardstock and started adhering all the flowers going in rainbow order.  I then adhere this piece to a cardbase and added the sentiment!  Super fun and easy card to make!


I love this cute set! I hope you like my card today and can be inspired to create some rainbow flowers! Remember this and many other amazing products you can find on the Scrappy Tail shop!  Have a great weekend!


Waleska


Saturday, January 23, 2021

Rainbows and Poppies for Scrappy Tail Crafts

Hello Friends, Waleska here excited to be with you again for another fun tutorial using Scrappy Tail Products...Today I will be creating with the beautiful new Popping Poppies Stamp Set, I hope you like it!


CARD DETAILS:

I started by cutting stripes of different colors of cardstock, I went for a rainbow look today.


I then adhered the stripes to a front card panel and cut the excess from the sides.  For my second card I did the same thing but I also added some gold glitter cardstock between each color of cardstock.


I embossed the beautiful heart with poppies on translucent vellum with white and gold embossing powders, with this image I wanted to create a focal point on my card.


I finally adhered the vellum pieces to the center of my rainbow striped cards using glossy accents and I finally added the sentiments on black cardstock I also added some gems.


Thank you so much for joining me today! I hope you have a wonderful weekend! Remember to check out the newest release from Scrappy Tail Crafts at the shop!


Waleska

Sunday, August 30, 2020

Sassy and Crafty/Guest Designer

 Hello Friends I am very excited to share with you a card I created as a Guest Designer for Sassy and Crafty with the cute Peaches Unicorn I had so much fun creating this colorful card I specially love this Rock Star Unicorn from the set! Check out all their amazing stamps and products you will love them


CARD DETAILS:

To create this card I used a rainbow die cut and I put some glitter embossing powder for sparkle, I wanted to create some shine to acccentuate this cute Rockstar to do that, I cut a star and adhered sparkling sequins to fill it.  I left it to dry for a while and started coloring my image.


I copic colored the image and highlighted some of it with a white gel pen.  I adhered the image to the sparkling star and added to the center of my card.


I did a second card exactly the same!!!


The first base of my cards are from gray cardstock and the second base is from black cardstock to continue with the cute rockstar theme!  Thank you so much for stopping by today!  I hope you are safe wherever you might be! Remember to Stay Sassy and Crafty ;)


Waleska


Thursday, August 6, 2020

Baby Shark Do Do Do Do Do Do

Hello Friends I am super happy to be sharing with you again!   I had so much fun creating this colorful slimline card I hope you like it! Since the first time I saw this MFT die I was in love!


CARD DETAILS:

I started by die cutting this fun MFT Baby Shark Die-namics with different colors of cardstock.
You can do them in any color, I added a little shading to the sharks with Oxide Inks for dimention.


To adhere together the shark mouth I found that it is easier to assemble the teeth and the inside part of the mouth and then adhere the mouth part.


To continue with this card I did the card background, I wanted a deep sea feel, I used oxide inks in colors Wilted Violet, Blueprint Sketch and Mermaid Lagoon, for the sand piece I used Trinity Stamps 
Slimline Scenic Border Dies I used Vintage Photo Oxide ink for the edges and splashed some vintage photo drops of water as well as some white acrilic paint mixed with water for some tesxture of the sand.


I also cut  two panels of the Lawn Fawn Bayou Bakdrop on a light green cardstock and shadede it with Lucky Clover Oxide Ink.


Aftter I had all my diecus ready and shaded I started planning where to put all the elements on this card-.  I adhere the sand and sharks and cut some leaves from the bayou die to glue them behind the sharks... I finished this card by gluing some irridescent bubbles.  I love this die I can almost here them singing.... Baby Shark!!!


I hope you are safe, thank you so much for joining me today for this fun tutorial.

All the products used to create this card can be found on the Butterflyreflections Ink Shop!

Hugs 


Friday, June 1, 2018

Rainbow Boy!

Hello Kindred Stamps Fans, Waleska from craftinglovew here to share with you a very sweet and colorful card with one of the many stamps that come in the "Of to See the Wizard" stamp set... This adorable boy is ready to make someone smile.


CARD DETAILS:

I started with the background for my card, I choose three of my favorite colors of Oxide Inks, Squeezed Lemonade, Twisted Citron and Peacock Feathers, this colors look great together and went well with the rest of my card.


I then die cut the rainbow and grass.  I colored the rainbow with markers and the grass with oxide ink twisted Citron, I adhere them to my front panel.


I wanted to give this happy card a little of sparkle, to achieve that I glue small iridescent star sequins... the trick to adhere this small sequins is to use a fine tip glue bottle so you apply the smallest amount of glue posible.  (I left the space to stamp the sentiment, this is important I almost forgot this step)...


To finish this happy card I adhere the sweet boy at the end of the rainbow with 3D foam squares.


I hope you like this card design because you can use it with different characters from the Kindred Stamps Collections.

Have a Wonderful Day!


Monday, October 23, 2017

Rainbow Party Newton

Hello Friends Waleska here with my Monday Blog Post as the October Guest Designer!!! I hope you have a great starting week!!  For today's card I gave halloween cards a rest and I used the Newton´s Costume Party Stamp Set for a non halloween card, I dress up Newton as a beautiful unicorn for a card ready to cheer up someone in need!!!


CARD DETAILS:

I used Oxide Inks for the background in colors Worn Lipstick, Fossilized Amber, Spiced Marmalade, Cracked Pistachio, Broken China and Wilted Violet,  I put all the colors on a Ranger Mat and I added a little water, I started smooshing a white card base beginning with the light colors until I smooshed all of the them to create a very colorful background.


I die cut the rainbow and color it with the same Oxide colors from the card base to unify the design, I stamped, cut and color three cats and adhere the unicorn horns to them.  I used 3D foam to raised the cats and cloud.  Finally I added the sentiment and clear sequins as embellishments.


The Newton´s Costume Party stamp set is so great because you can use it for many occasions! I hope you like my card and I inspire you to use this and other sets in different ways!

Have a wonderful week!


Monday, June 5, 2017

You Color my World!

Hello, I hope you are having a nice day! For my today's card I used almost all of the new an amazing Oxide Inks... Do you know we now have them at the CDD shop? you can also find Nuvo products lots of CDD sequin mixes, cute Doodlebug Paper and Washi... well you might want to check out the Supplies section at the shop and include some of the new products we have to your next purchase!


Now for my card  I used the cute girl from the "Weather Gnomes" and color her with markers in the same colors of the rainbow background.  For the background I sponged the oxide inks in rainbow order to the card base and after that I added lots of water for the colors to move.  When that was dry I sprinkled more water for a more fun effect.  I die cut a cloud and glue the cute painting gnome, as embellishments I used Nuvo drops!


CDD Products:


Hope you have a wonderful day!

Wednesday, May 3, 2017

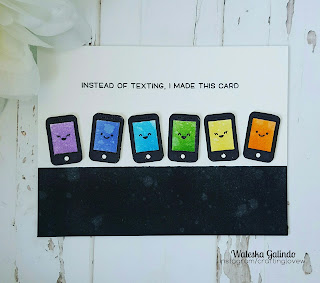
Black White and Bright!


Hello Crafty Friends! I hope you are having a nice day!
Today I made this card for the 

Challenge #4 Black, White and Bright!


I made this card with the Lawn Fawn Love Letters Stamp Set
and color the little cellphones in Rainbow order
 I used distress inks in colors:
Wilted Violet
Blueprint Sketch
Salty Ocean
Mowed Lawn
Squeezed Lemonade
Carved Pumpkin


This is a very simple card but I think the cute faces
are adorable! I love Lawn Fawn products!

Hugs,


Waleska


Monday, April 24, 2017

What is a CAS card?

Hi Card Makers... For this week's challenge on the


The theme is CAS


And as dumb as it can sound I did not know 
what does CAS mean... I hear it before and kind
 of have an idea of it, but did not know exactly 
the meaning of creating a CAS card, so here is
what I learned:

What is CAS?
CAS stands for Clean and Simple

*Your card has to have a design concept
and not so much embellishments.
*Your card needs to be uncluttered
*Your card needs to have lots of 
white space or open space
*Your card needs to have a focal point

But everyone can understand CAS
in different ways, everyone have their
own design style, so I guess the Card Police
is not going to arrest you if you make your
own style of CAS... hahaha

Hope this can help instead of confuse you!
For my card I made a rainbow, but I don't have 
a Rainbow die so I created one with a hill die 
from the Lawn Fawn Simple Stitched Hillside Borders


This is a little trick I learned from the Amazing
Jennifer McGuire (video link)


I cut lots of this borders from different colors
and then glue them together to make the 
Rainbow... They fit perfect so it is very easy
to make perfect Rainbows.

I hope you can play along with us at the
Always Fun Challenges
there is a new challenge every Monday!

Hugs

Waleska

(The information in my post is from
Splitcoaststampers)