Friday, November 6, 2020

Fall/Winter Coffee Lovers Blog Hop

Hello Friends Welcome to the Fall/Winter Coffee Lovers Hop this is my first time participating on a coffee lovers hop! Check out all the amazing projects the Kat Scrappiness Design Team created! Also remember to use the code FALLCOFFEE2020 for a 15% off  on all Coffe, Fall, Autumn, Halloween and Thanksgiving categories at the Kat Scrapppiness Shop.


CARD DETAILS:

To create this fun card I used the Got Coffee? Die by Kat Scrappiness, this die is awesome to create coffee cards the cups look so realistic with all the details.  I cut the cups with kraft cardstock and the details with different colors of paper I then inked the edges of the colored cardstock and used some stars for the center of my coffee cups.  I used a Slimline card base and inked this panel with the same color of inks I used for the cups for a rainbow effect. My card base was made from kraft and I added the sentiment.


Thank you so much for joining us on this hop, now let's keep on hopping and get inspired for more coffee themed projects.


Waleska


Thursday, November 5, 2020

Kat Scrappiness and InkOn3 Collaboration Blog Hop


Welcome to the “Happy Harvest Hop from Kat Scrappiness & Ink on 3!” We are thrilled you could join us on this blog & Instagram hop celebration! We will be sharing darling fall cards featuring Kat Scrappiness amazing dies and sprinkles and Ink On 3’s fabulous inks and darling fall stamps. Come hop with us for inspiration and of course prizes! I worked with the beautiful Pumpkin Patch from InkOn3 and many Kat Scrappiness products.

The hop is November 5th at 10am CST and will end on November 8th at midnight. We will have 4 x $15 winners!! 2 from randomly chosen blog posts and 2 from randomly chosen Instagrams so the more you comment the better chance you have.

To participate in the hop giveaway, simply leave a comment on each blog post, follow each DT on Instagram, comment and tag your friends. The more you comment the more chances of winning. Bonus entries for following our stores on all our social media below:

The winners will be announced on the Ink on 3 and Kat Scrappiness blogs & Instagrams on November 10th. You will need to contact us to claim your prize. You can subscribe to our blogs for a notification email on any new blog posts. You will have 7 days to claim your prize.

Thank you for hopping with us and supporting our small businesses!
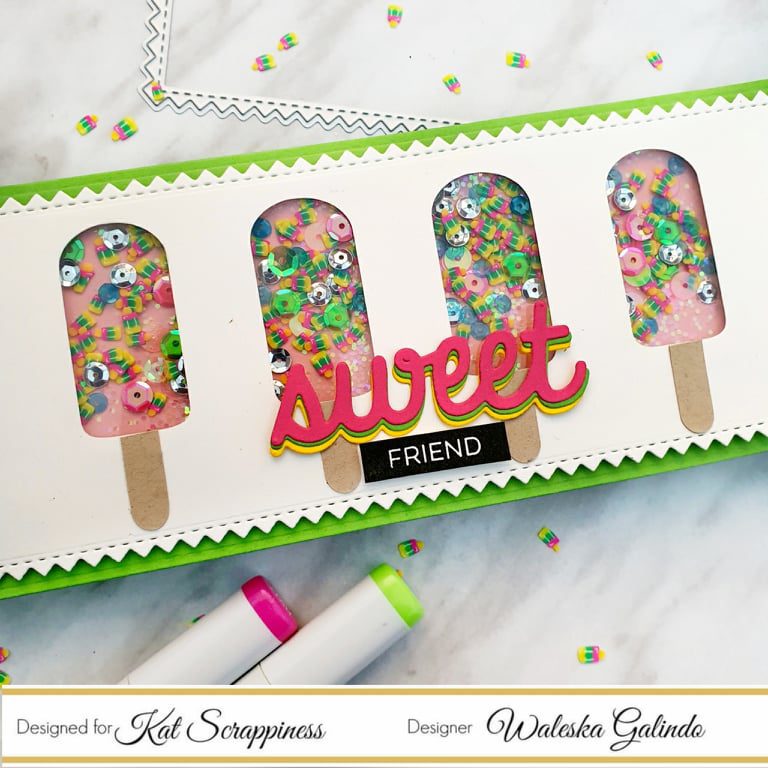
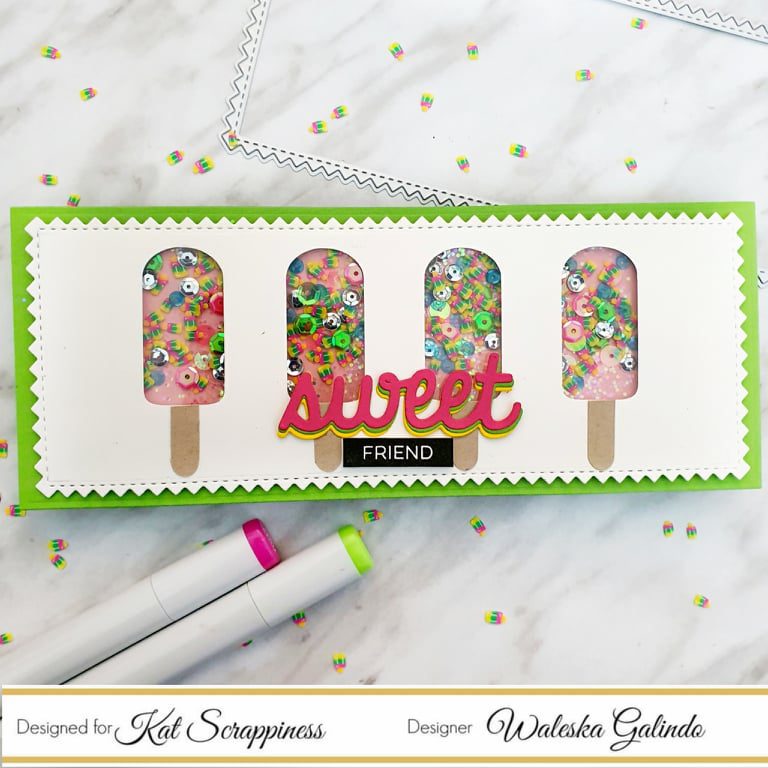


CARD DETAILS:

I started stamping the InkOn3 Pumpking Patch stamp on watercolor cardstock with black Versamark Ink.  I then started coloring with a mix of the InkOn3 Atelier inks in colors:
.
Marilyn Red
Twiggy Brown
Bee Sting Yellow
I used a watercolor brush and started coloring all the images mixing this thee inks.  I did a first layer leave it to dry and then did another layer trying to intensify the colors on some parts, by mixing this inks I created new colors! this inks are beautiful to watercolor I love them.


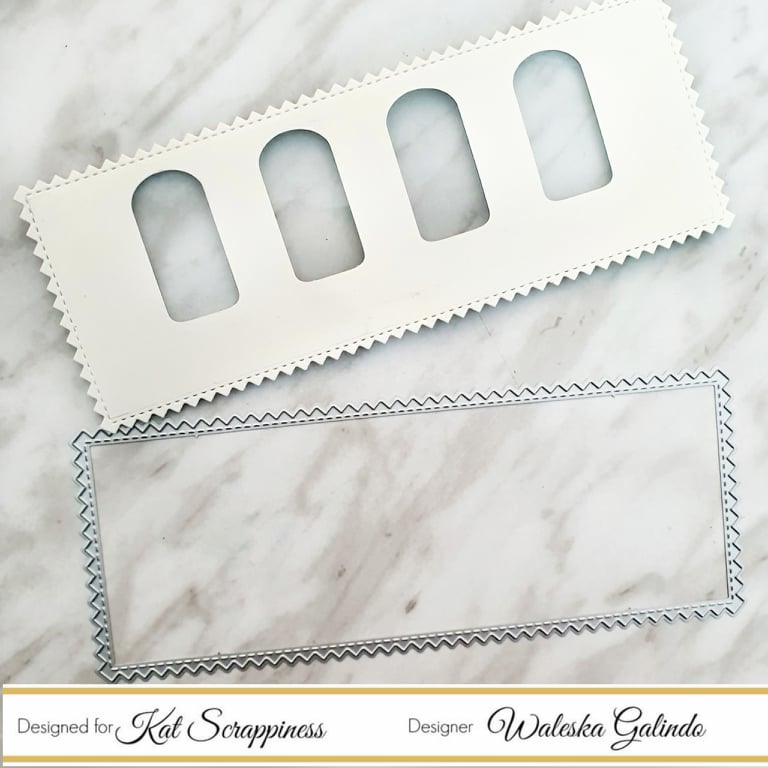
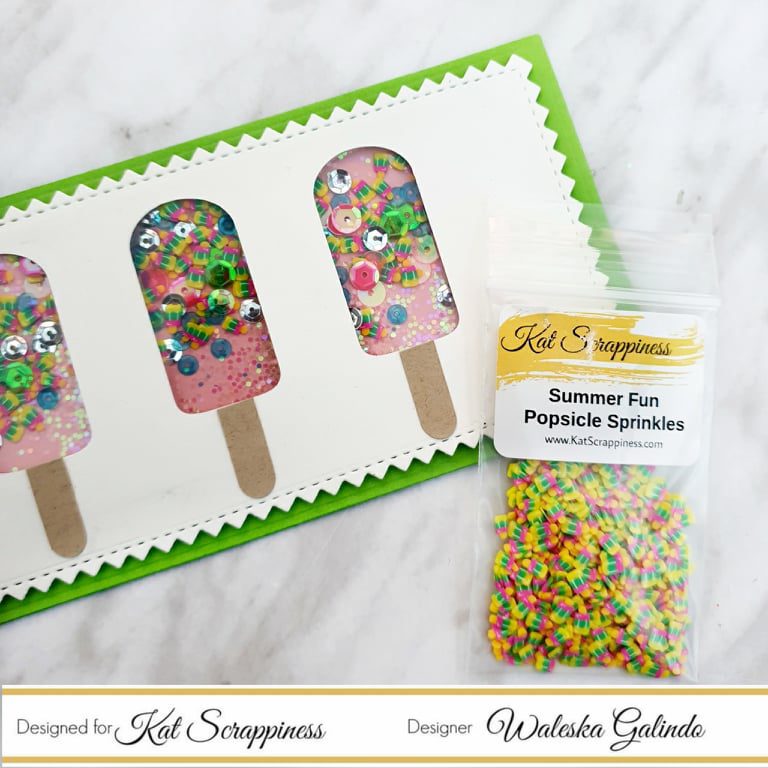
When I finished coloring the stamped piece I used the Kat Scrappiness Stitched Postage Stamp Edge Rectangle die to create the base and used some pumpkin orange ink to blend around the edges I also did some water splashes with the same colors of ink and also added the beautiful InkOn3 Liquid Pixie Dust for some sparkle.  I added the sentiment and some Kat Scrappiness Rainbow Jewels.

Thank you so much for stopping by and checking out my card, now keep on hopping and good luck!


Hop Order:


Kat Scrappiness @katscrappiness

Ink on 3 https://inkon3.blogspot.com/2020/11/kat-scrappiness-ink-on-3-blog-hop.html https://www.instagram.com/inkon3

Meghan Kennihan @MadeByMeghanK

Kathy Schweinfurth @stampinkathy4    

Jo Thompson @thompson_jo

Priscilla Joseph @nubblelightdesigns

Waleska Galindo

https://craftinglovew.blogspot.com/2020/11/kat-scrappiness-and-inkon3.html

 @craftinglovew  

Jenny Hall    @thejennyhalldesign

Erica A-B  @erica_cacacraft

Lynnea Hollendonner @lynneahollendonner

BromeroCards @bromerocards  

https://simplybeautifulcreations.blogspot.com/2020/11/happy-harvest-hop-with-ink-on-3-kat.html  @cealp


Waleska Galindo


Wednesday, September 23, 2020

Sweet Slimline Shaker/Kat Scrappiness

   Hello Friends happy to share with you a yummy summer card!!! I know summer is almost over, but lately I have been making some last summer cards, I hope you like it plus I am sharing some of the new Kat Scrappiness sprinkles .


I started by cutting my card base with the largest of the new Zig Zag Nesting Slimline Dies and with an electronic cutting machine I cut the silhouette of some popsicles to match with my shaker sprinkles.


I then created the shaker by adding some 3D foam on the back of the front panel and adding the Popsicle Sprinkles mixed with some sequence and some glitter.  I adhere this panel to a green cardbase to match the color of my sprinkles.

I added the Sweet sentiment in three colors, again to match the sprinkles colors and added a friend sentiment too.

I hope you like my sweet slimline shaker card and can be inspired.

Stay safe, Stay crafty,


Waleska

Wednesday, September 9, 2020

Trinity Stamps Slimline Layered Balloons Stencil 4 Ways

Hello Friends I wanted to share the cards I created for the Trinity Stamps T.I.P Time... If you haven't check out this feature, I invite you to join me for quick and easy tutorials on the Trinity Stamps Instagram Stories on Wednesdays and on my stories on Friday!  Once in a while I will be sharing some of the tutorials here, but if you want to catch the entire collection of tutorials just head on the my IG Stories!!


This Slimline Layered Balloons stencil comes with two stencils that are very easy to line up to add detail to large slimline cards or any other size of card too.


For my first  card I used Oxide Inks: Cracked Pistachio, Mustard Seed and Dried Marigold.


I used Stickles Glitter Gel Moon Dust on the first layered stencil and added the bold sentiment on the right corner from Trinity Stamps too.


For my next card I used Oxide Inks on Kraft Cardstock in many different colors, I love how Oxide Inks colors pop on Kraft Cardstock I also added a bold sentiment.


For my last card I wanted to create some transparent balloons to do that I used White Pigment Ink I first created the background with Oxide Inks in colors Worn Lipstick, Dusty Concord and Shaded Lilac, it won't look all that nice right now but when you add the balloons, it will look great!!


I love all this Slimline cards, this cards can be easily made with this fun Trinity Stamps Stencil, they have some other amazing stencils too check them out HERE.

Thank you so much for stopping by today, remember to stay safe and stay crafty!!!


Waleska


Wednesday, September 2, 2020

Draw your own scenes... Simple and Easy with Trinity Stamps

Hello Friends I wanted to share my cards I created last week for the Trinity Stamps T.I.P Time if you haven't check out this feature you I invite you to join me for quick and easy tutorials on the Trinity Stamps Instagram Stories on Wednesday and on my stories on Friday!  Once in a while I will be sharing some of the tutorials here, but if you want to catch the entire collection just head on the my IG Stories!!


Today I wanted to share a some quick and easy ways to make your own scene cards... I like to combine some drawing, stamping and inking to my cards, I am still learning how to create an entire draw scene and then copic color it.  But in the meantime I do this small draw scenes!  I got my inspiration from google they are super simple to make, you just need a ruler (very importat) a pencil to sketch your scene and then color it with markers.


When I finished coloring this two scenes I masked  them to ink blend the sky with Tumbled Glass Oxide with a Trinity Stamps blending buddy brush.


To make scene cards more realistic I almost always try to add some natural elements like this tree from the Great Outdoors die set.


Now comes the fun part!!! I colored several images from the Let's Ride Together set and the Classroom Cuties set too.  You have 25 separate stamps on the Let's Ride Together set to have fun!


I adhered all my images to the cads and also added the sentiments.  This cards are perfect Thank You Cards!!!


How fun are this cards? I love the end result... Would you try them? If you try them share them on social media and use the hashtag #trinitystampstiptime.  Thank you so much for stopping by today! Have a great day! Stay Crafty Friends!!

Waleska


Sunday, August 30, 2020

Sassy and Crafty/Guest Designer

 Hello Friends I am very excited to share with you a card I created as a Guest Designer for Sassy and Crafty with the cute Peaches Unicorn I had so much fun creating this colorful card I specially love this Rock Star Unicorn from the set! Check out all their amazing stamps and products you will love them


CARD DETAILS:

To create this card I used a rainbow die cut and I put some glitter embossing powder for sparkle, I wanted to create some shine to acccentuate this cute Rockstar to do that, I cut a star and adhered sparkling sequins to fill it.  I left it to dry for a while and started coloring my image.


I copic colored the image and highlighted some of it with a white gel pen.  I adhered the image to the sparkling star and added to the center of my card.


I did a second card exactly the same!!!


The first base of my cards are from gray cardstock and the second base is from black cardstock to continue with the cute rockstar theme!  Thank you so much for stopping by today!  I hope you are safe wherever you might be! Remember to Stay Sassy and Crafty ;)


Waleska


Saturday, August 29, 2020

Kat Scrappiness + Wow Embossing Powder Blog Hop

Welcome to the WOW! Embossing Powder & Kat Scrappiness Blog Hop! We have TWO days of inspiration for you using Kat Scrappiness Stamps, Dies, and Embellishments and WOW! Embossing Powders. And of course there are amazing PRIZES!

WOW! Embossing Powders is giving away a $25 Gift Certificate to either their UK or USA Store and Kat Scrappiness is giving away a $25 Gift Certificate to their store. All you need to do to win is COMMENT. The more blogs you comment on the more chances you have to win! The winners will be chosen at RANDOM from ANY of the blogs on the two day hop. 


Card #1 


For my first card I used a bunch of Wow Embossing Powders to create this fun scene with this adorable crabs from kat Scrappiness.  I started with the water, I used the Waves Border dies from Kat and Under the Sea Wow Embossing Powder.  I then created the sand with the Winter Dies by Kat and and sprinkled a little of Perissa Embossing Powder.  The night sky is made with Black Magic Wow Embossing, it looks super amazing! I added this panel to a base I created using the Stitched Postage Edge Rectangle I colored the fun crabs from the Summer Gnome add on stamp set, for the sentiment I used this funny one from the Summer Gnome set.


Card #2

For my second card I used the Kat Scrappiness Foliage Frame die and the Happy Easter Word die, I cut the Easter and leave only the Happy word.  The Wow Colour Blend Verdigris is an amazin embossing powder full of texture and different colors it can totally be my favorite!!!

Card #3


For my card #3 I used the also super beautiful Wow Under the Sea Embossing Powder, I diecut the Under the Sea cover plate by Kat, I put embossing ink all over this background die and added the embossing powder.  I wanted to give it a sandy look to do that I used Vintage Photo distress ink only on the edges.  I also added some pearls.  To create the background I used kraft cardstock and inked it with blueprint sketch and speckled egg oxide ink.  I used a gray a cardbase, for the sentiment I used MFT stamps products.

Card #4


For last card I used again the Under the Sea cover plate from Kat and I added Wow Bang Embossing Powder... I have to say this embossing powders are just magical!! the colors, the textures! Wow just Wow.

You have come here from Natasha Davies the next, on the Hop is Verity Biddlecombe

If you get lost along the way here are the lineup for the day!

Waleska Galindo***(you are here)

Waleska Galindo

Thursday, August 27, 2020

Jessica Lynn Originals/Doctor Brentwood Card

 Hello Friends! I am super happy today to share the card I made with cute Jessica Lynn Originals Brentwood Owl The Doctor! I had so much fun creating this card, I used a bunch of dies that I have never used before.  I hope you like it.


Card Details:

I started by coloring cute Brentwood with copic markers I had the idea of using a bunch of dies to make it like a doctor prescription, To make that I used the Spellbinders August Large Die of the Month Write on.  I also used some MFT health related dies, the Band-Aids Die-namics and the Tissue box is from the Bedside Comfort Die-namics set.


You can find the cute Digital image/Instant Download Brentwood Owl Doctor on Jessica Lynn Original site to make some thank you cards or get well cards, you can also find a bunch of other great stamps you will love.

Thank you so much for stopping by today! please take care and stay safe!


Waleska


Divinity Designs Guest Design Cute Monkeys Slimline


Hello Friends today I have this fun Slimline with this adorable monkes from Divinity Designs, and also a bunch other great products also from them.

For my card today I used the Divinity Designs Slimline Card base dies on kraft cardstock.  For my card base I used the Slimline Layering Rectangles.  I used Oxide inks in colors Dried Marigold Mustard Seed and Squeezed Lemonade and I also add some water splashes.


I then planned out my jungle scene with the Divinity Designs Fern Dies and Tropical leaves those I inked with Mowed Lawn and Lucky Clover Oxide Inks, I love the texture of the leaves!


I adhered the leaves in place once I was happy with the placement and cut the excess from the borders.  I copic colored my cute monkeys and stack them to fill the slimline card.  I stamped the sentiment at the top of the card and added a kraft Scalloped rectangle die to finish this fun card!


I am super happy to be Guest Designing for this amazing company their dies are really amazing check them out HERE.

Thank you so much for stopping by today and sharing some craty time with me! Stay safe...


Waleska
 

Divinity Designs Products used:

Thanks a Bunch Stamp Set

Slimline Scalloped Rectangles

Slimline Layering Rectangles

Ferns Dies

Tropical Leaves Dies 

Friday, August 7, 2020

MFT Sketch Challenge #501

 Hello Friends I just wanted to share a very quick and easy card I created for the current MFT Sketch challenge I was very inpired on the amazing Laura Bassen with this design.  I am more on the cute whimsical side but today I had a lot of fun with this design!


I had this scraps of rainbow paper from a bunch of envelopes I made for my cardmaking photograps! I just love the look of a good simple rainbow... Don't you?  I used the Love die from MFT as well as a cute sentiment from the From the heart stamp set from MFT also!

Fingers Crossed I win some money!  I am going to need it to buy the entire release coming soon from MFT.

My inspiration:

I hope you have a great day! remember to stay safe and stay crafty!


Slimline Room Builder Set + Classroom Cuties Stamp Set

Hello Friends thank you for being here today!! From now on every Friday I will be sharing a brief tutorial showcasing some Trinity Stamps Product for you to know more about.   You can also find a quick Instagram story about it HERE.  

This is just released die is the perfect addition to your slimline dies to create indoor scenes!!


CARD DETAILS:

With a total of 17 dies the Room Builder die contains many pieces to create the most amazing indoor scenes.  I had the idea of creating a classroom with this die so I cut some of the pieces and created some fun new elements.  With the window die I created a board, a door and a shelf for bags... 

After I created all the classroom elements I started assembling my room.


I started with the floor, I wanted to create a wood floor, to create the wood I used Distress Inks in colors Walnut Stain and Vintage Photo swiping it on the top and bottom of the floor.

I then cut the walls from different colors and adhere this three together and just like that the room starts looking great!

I die cut and stamp the rest of the elements I also used the Classroom Cuties stamp for the cute classmates, the bags and lunch boxes on the bookshelf.  The banner is a from the lawn fawn box die.

I glue all the elements on the classroom and I just love how everything looks!  I tryied to stay on a consistent color palette which was red blue and yellow for a cohesive look.

I hope you like this idea to create a classroom card! I had so much fun creating this one and I love how everything looks together!  Give it a try... what else can you create with this die? 

Stay safe, Stay Sane, Stay Crafty!