Showing posts with label distress oxide inks. Show all posts

Thursday, April 6, 2023

Smiley Pandas/ Sunny Studio Stamps

Hello there! I am happy to be back on the blog to share a happy card featuring the Panda Party Stamps I also used the Frilly Frames Hexagon and the Mini Mat & Tag #1 Dies.

CARD DETAILS:

I started by cutting the biggest of the Frilly Frames with white cardstock and inking another piece to adhere on top of this frame with Oxide Inks in colors Wilted Violet, Picked Raspberry, Carved Pumpkin, Mustard Seed and Cracked Pistachio, I did some watercolor splatters for more interest.  I then cut the small scalloped rectangle from the Mini Mat Tag #1 Dies and created a little scene with stencils and oxide inks.


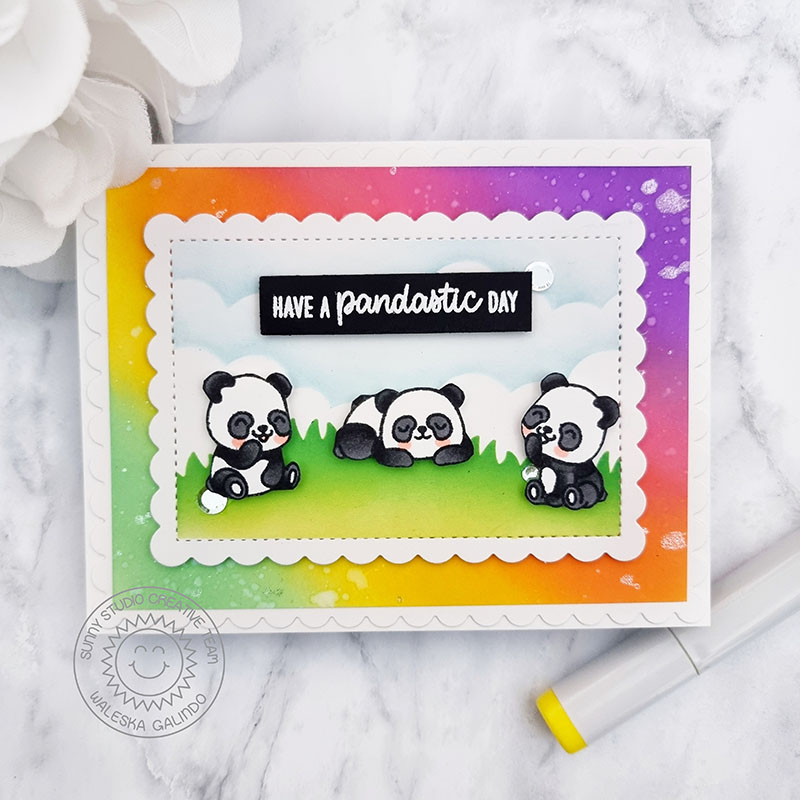
I then stamped and cut the cutest three pandas from the set and adhere them in the scene, I stamped one of the sentiments with white embossing powder on black cardstock, such an adorable card to wish someone you love a pandastic day!
Thank you so much for stopping by today have a great rest of your week!


Thursday, December 22, 2022

Christmas Tags/Sunny Studio Stamps

 Hi Friends!

Today I have a fun idea for all those last minute gift wrapping and tags for gifts, they are simple and very easy to assemble I hope you like them!


Project Details:

The Mini Mat & Tag #1 set is just adorable and I had so much fun piecing all this tags together with different colors of cardstock and different cute critters!
I started by cutting the main tags with white cardstock I then cut the top that comes with the set from different colors of cardstock from the Joyful Holiday Christmas Paper Pad.  I cut four pieces of the rectangle from the Mini Mat & Tag #3 and inked them with oxide inks matching the colors I used for the tops of the tags.  The Oxide Ink colors I used are: Picked Raspberry, Candied Apple, Peacock Feathers and Mowed Lawn.  I added water splashes and sparkle watercolor.


I then stamped and color the four cute critters from the Christmas Critters Stamp and adhere them to the inked pieces, finally I stamped the To and From from the Christmas Icons stamp set.
I love how adorable this cuties look peeking on this colorful tags! I hope you like them and can be inspired by them! Have a great rest of your day! Merry Christmas!


Thursday, July 15, 2021

You are a Killer Slimline card/ Whimsy Stamps Guest Designer

 Hello Friends!!! Waleska Galindo here from craftinglovew super happy to share with you my second post as this month's Guest Designer for Whimsy Stamps.  I am crazy for the new Lookin' Shark stamp set, I have a crazy love for shark stamps and this one is definetely one of my favorites so far.  I mixed this funny stamp set with the Slimline Connected Bubbles die set to create an underwater card.


CARD DETAILS:

To create this card I started with the background.  For the background I used Oxide inks in colors Peacock Feathers in the middle of the panel then I used Salty Ocean and on the edges I used Lucky Clover I blended this tree colors very well and added some water splashes for more texture and to create the under water feel to this panel.


I set this panel aside to dry and I die cut six of the Slimline Connected Bubbles die and adhere them together so they can have dimention.  I then put glue around the bubbles and add sparkling glitter to them, they look super fun with the dimention and glitter.  


I colored the super adorable and fun Sharks with Tri-blend Spectrum Noir markers in colors Ice Grey Blend, Dark Red Blend and Jade Green Blend I cut them and adhere them to the back of the biggest bubbles so they will look like they are inside the bubbles.  I stamped the sentiment with black ink and glue this panel to a white card base.


I had so much fun creating this card, I want to thank Whimsy Stamps for the amazing opportunity to design with ther awesome products I love it!!! I hope you can be inspired to create some fun summer cards with Whimsy Stamps products and remember to stay safe and stay crafty! hugs!!!


Monday, January 11, 2021

Outlined Tulip Layered dies from Scrapppy Tails Crafts

 Hello Friends, Waleska here excited to be sharing some time with you!  Also excited to be creating with the newest release for my card today I used the beautiful Outlined Tulip Assortment Two Layered Dies, I hope you like it!


CARD DETAILS:

I started by die cutting the tulips and the stems in two different shades of pink and green cardstock, in dark and  light tones, after that I used Oxide Inks in colors Picked Raspberry to shade the pink tulips in the bottom part and Rustic Wilderness for the stems.


I then worked on the card base, for the card base I die cut a circle as the focal point and I used Oxide ink Peacoack Feathers to shade the up part of it.  For the card base I used the same color but shade it at the bottom, I did some water splashes with a fine brush and let it dry.


I finally adhered the circle die cut to the center of the card base and start assemble the tulips.  I adhere the tulips with 3D Foam squares.  I stamp the sentiment from the Popping Poppies Stamp set to a black strip of cardstock.  I finally splatter some gold watercolor and added some gold sequins.


Thank you so much for joining me today! I hope you have a wonderful weekend! Remember to check out the newest release from Scrappy Tail Crafts at the shop!


Waleska

Wednesday, September 9, 2020

Trinity Stamps Slimline Layered Balloons Stencil 4 Ways

Hello Friends I wanted to share the cards I created for the Trinity Stamps T.I.P Time... If you haven't check out this feature, I invite you to join me for quick and easy tutorials on the Trinity Stamps Instagram Stories on Wednesdays and on my stories on Friday!  Once in a while I will be sharing some of the tutorials here, but if you want to catch the entire collection of tutorials just head on the my IG Stories!!


This Slimline Layered Balloons stencil comes with two stencils that are very easy to line up to add detail to large slimline cards or any other size of card too.


For my first  card I used Oxide Inks: Cracked Pistachio, Mustard Seed and Dried Marigold.


I used Stickles Glitter Gel Moon Dust on the first layered stencil and added the bold sentiment on the right corner from Trinity Stamps too.


For my next card I used Oxide Inks on Kraft Cardstock in many different colors, I love how Oxide Inks colors pop on Kraft Cardstock I also added a bold sentiment.


For my last card I wanted to create some transparent balloons to do that I used White Pigment Ink I first created the background with Oxide Inks in colors Worn Lipstick, Dusty Concord and Shaded Lilac, it won't look all that nice right now but when you add the balloons, it will look great!!


I love all this Slimline cards, this cards can be easily made with this fun Trinity Stamps Stencil, they have some other amazing stencils too check them out HERE.

Thank you so much for stopping by today, remember to stay safe and stay crafty!!!


Waleska


Thursday, August 27, 2020

Divinity Designs Guest Design Cute Monkeys Slimline


Hello Friends today I have this fun Slimline with this adorable monkes from Divinity Designs, and also a bunch other great products also from them.

For my card today I used the Divinity Designs Slimline Card base dies on kraft cardstock.  For my card base I used the Slimline Layering Rectangles.  I used Oxide inks in colors Dried Marigold Mustard Seed and Squeezed Lemonade and I also add some water splashes.


I then planned out my jungle scene with the Divinity Designs Fern Dies and Tropical leaves those I inked with Mowed Lawn and Lucky Clover Oxide Inks, I love the texture of the leaves!


I adhered the leaves in place once I was happy with the placement and cut the excess from the borders.  I copic colored my cute monkeys and stack them to fill the slimline card.  I stamped the sentiment at the top of the card and added a kraft Scalloped rectangle die to finish this fun card!


I am super happy to be Guest Designing for this amazing company their dies are really amazing check them out HERE.

Thank you so much for stopping by today and sharing some craty time with me! Stay safe...


Waleska
 

Divinity Designs Products used:

Thanks a Bunch Stamp Set

Slimline Scalloped Rectangles

Slimline Layering Rectangles

Ferns Dies

Tropical Leaves Dies 

Wednesday, March 11, 2020

I am a Lucky Guest Designer for Heffy Doodle this Month!!!!!

Hello Friends Waleska here  so happy to be Guest Designing this month for one of my favorite companies in the world Heffy Doodle!!! I created two lucky and happy cards for you today, with the adorable Lucky Friends stamp set and the beautiful Rays The Roof Stencil, I hope you like them.
Check out my post on the Heffy Doodle blog!!

Thank you so much for stopping by today, as I said before I am super excited to be sharing some inspiration with Heffy Doodle products please head to their blog for all the details on my cards!!! I hope you have a great day and remember to stay CREATIVE!

Thursday, April 25, 2019

White Rabbit/ Heartcraft Paper Guest Designer

Hello Friends!!! I am so happy today to be sharing with you my project for this month as Guest Designer for Heartcraft Paper I am super happy to continue working with my friend Monica and her adorable digital images.  I used the fun digital image White Rabbit... check out more of this fun collection of digis at the Heartcraft Paper shop...


CARD DETAILS:

To create this card I used the White Rabbit digital image I colored it with markers and I was inspired by the actual white rabbit from the movie for the coloring.  For the background I used my all loved Oxide inks in colors Tumbled Glass and Salty Ocean and some water splashes.  I used a white card base, I used little hearts and sequins as embellishments.

I hope you like my card today and can be inspired... 


Heartcraft Paper Supplies:


Monday, February 11, 2019

Jessica Lynn Original Stamps Guest Designer for February


Hello my friends!!! I am so happy today to be a Guest Designer for Jessica Lynn Stamps. That is one more reason why I loove social media specially Instagram... You post and create and you never know what is going to happen with the things you post... Maybe one day you wake up to an amazing message inviting you to Guest Design, the next day you make a new crafty friend, or the next day you realize an amazing comment totally cheer you up on a terrible day!!! 
My card today was totally inspired by the love that is in the air....


CARD DETAILS:

To start with this card I cut the base with the Gina Marie Ric Rac Nested Rectangle Die and used Oxide Inks first with a layer of Spun Sugar very light, then with Worn Lipstick and finally with Candied Apple... I splash a little water to this panel.    
I had a blast coloring this sweet Puppy from Jessica Lynn Original called Hot Dog Dachshund with Zig Markers in colors Oatmeal, Brown, Beige, Yellow and Wine Red.


To finish this cute card I used Nuvo Glimmer Paste Moonstone with a heart stencil leaving the part for the sentiment without the glimmer paste.  I stamped the sentiment and add some sequins in the doggie colors.  I adhere this panel to a black card base for contrast...


He is the cutest little doggie ever!!! Check out all the Jessica Lynn Original stamps at her Shop HERE.
I hope you like my card have a wonderful day!!!


Monday, February 4, 2019

You are one in a Melon - Heartcraft Paper Guest Designer

Hello Friends!!! I am so happy today to be sharing with you my first project for this month as Guest Designer for Heartcraft Paper I will be Guest Designing for my friend a second term.  I used the Yummy digital image Watermelon Pop... check out more of the awesome digis at the Heartcraft Paper shop...


CARD DETAILS:

To create this Yummy card I used some of the Oxide Inks I am currently obsessed with:
Spun Sugar and Worn Lipstick.  I started with the background going with the lightest color first and then blending the darkest shade of Oxide Ink... I then resize and print my yummy watermelons and colored them with the same oxide ink colors.  I used a mask for the bottom part of the watermelon.  I used markers for the stick and the green part, I finally used a black Ultra fine Sharpie marker for the watermelon seeds.  I used 3D foam for the watermelons and I used a Kraft Card stock  as a card base.  I used sequins as embellishments.

I hope you like my card today and can be inspired...  What is your favorite fruit? 


Heartcraft Paper Supplies:


Saturday, January 5, 2019

Aquapura/Heartcraft Paper Guest Designer

Hello Friends!!! I am so happy today to be sharing with you a project as a Guest Designer for Heartcraft Paper I will be Guest Designing for my friend Monica for a second term.  I used the magical digital image Aquapura... check out more of the awesome digis at the Heartcraft Paper shop...


CARD DETAILS:

I wanted to create an ocean scene with this magical image.  I used Oxide inks for the waves  and add water splashes  I print and color the digital image with markers.  I adhere it to the card and also some sequins.  With a glitter pen I put some sparkle to the wings... I adhere this panel to a white card base.


I hope you like my card today and can be inspired...  What is your favorite magical image?


Heartcraft Paper Supplies:


Saturday, August 4, 2018

Beautiful Pegasus/New Heartcraft Paper Company

Hello Friends, today I  am a guest designer and wanted to share a card I created for one Awesome new company called heartcraftpaper of one of my good crafty friends Monica, she is super talented and has many great digis at her shop...You can find digital stamps, digital sentiments, digital cutting files and digital paper.... check her new Pegasus release HERE.


CARD DETAILS:

Ok so I loooove her new Pegasus Release, but this one is definetely my favorite, it is called Pegasus Prance.  To create this magical card I started coloring the pegasus with markers, I print many of this so I can have them ready for more cards (that is what I love about digis) I then with an embossing marker I put embossing ink on its hair and tail and added glitter embossing powder for a glittery look!!!


To create the background I used many different Oxide Ink colors, I started in the center with Peacoack Feathers and work my way out with Shaded Lilac, Seedless Preserves and the new Spun Sugar (how could I live without this color before).  I then added some water drops and with a white pigment ink and some circle stamps I created a bokeh feel to the background.


To finish the card I cut and adhere the pegasus to the background and added some small star sequins and glue this panel to a white card base.

I hope you like this magical card with this magical pegasus and you can check out this new amazing company!   Have an amazing Saturday!!!


 Heartcraft Paper Supplies:


Other things you can find at the Shop: