Páginas

Tuesday, April 24, 2018

Mixing Embossing Powders

Hello Friends, thank you for stopping by my blog today for another Wednesday Quick Tip using Brutus Monroe stamps and products, every Wednesday you can find a blog hop at the Brutus Monroe blog featuring a product or technique of the week!, all the Design Team works very hard to share great inspiration for you!! You can find the hop HERE.   This week we are focusing on the beautiful Brutus Monroe Embossing Powders.  I had so much fun creating this cards, I just couldn't do only one.


CARD DETAILS:

I did this four cards the exact same way, the only things I change were the Embossing Powder colors.  I started creating the base for my card with the beautiful rouge Color Burst.  I sprinkle some on the card and add enough water for the color to move.  I let the pieces dry and started creating the stamping.


I apply Brutus Monroe embossing ink to the entire 6 x 6 baroque stamp set and stamped the image on the Color Burst panels.  I then used almost all the Embossing Powders I own, with my fingers I sprinkle different colors of embossing powders around the stamped image to create this awesome look of blended embossing powders colors.


I heated all the panels with my heat gun and let the different embossing powder colors to blend with the heat.  I glue all my panels to black card bases and stamped a congrats sentiment,


I hope you give this idea a try and blend your embossing powders to create a beautiful look to your cards,


 Create amazing projects with Brutus Monroe Fine Detail Embossing powders and give some fabulous raised and shine to all your cards!!  Don´t miss anything and hop along with us!!! and be inspired by this talented ladies:


.  Brutus Monroe Supplies:

Baroque Background

Brutus|Monroe Embossing Ink 2x2

Brutus|Monroe Color Burst Essentials Pack

Metallic Embossing Powder - Gilded

Friday, April 20, 2018

Two Tone Scene Card

Hello Friends Waleska from craftinglove here, I love the Waffle Flower Hooray Stamp Set, the images are very unique and cute. Sometimes when I need some inspiration to create my cards I look for the image designers, and for this card I was very inspired by Helen Dardik the creator of this beautiful images. You can check her beautiful artwork on her instagram account.


CARD DETAILS:

I started laying out my images and making masks for them, I masked the hill with post it sheets and stamped all my images with Blueprint Sketch Oxide ink, I let them dry and masked all the images. I sponge the background with Worn Lipstick Oxide ink and added some water splashes. I let that dry a little and add some splashes with the blueprint sketch and worn lipstick mixed with water, I also added gold watercolor splashes for a little sparkle here and there.


I wanted a two tone card, so to make the card base match perfectly, I sponge the edges of a card base with blueprint sketch oxide ink and added the fun sentiment with the same color.

Here is a closer look of the gold splashes and the masked images, if you check out Helen Dardik artwork you will see that sometimes she leaves her images white and she uses lots of blue for them.


I hope you like my card today and can be inspired to sometimes think outside of the box on your card designs and look for inspiration everywhere.

Remember you can find the lots of great products at the Drive by shop
and if you want to save some money on your next purchase use the code:

SHOPWALESKA
and save 10% on $25 or more

Have a nice weekend!


Supplies used:

Using Small Stamped Images

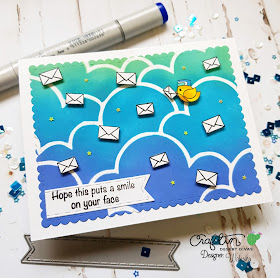
Hello Friends today I wanted to share a very cute card showing you how you can use some of the small images that come on most of your stamp sets, I find that this small images can help you create some quick and simple cards, and because they are small stamps you even save time on the coloring... 


CARD DETAILS:

For my card today I started with the background... Have you check out the amazing new Cloudy Sky Stencil? It is amazing to create a quick and beautiful skys, to color it I used Oxide Inks in colors Blueprint Sketch, Salty Ocean and Cracked Pistachio, I die cut this piece with the largest of the Fancy Frame dies.


I decided to use one of my favorite stamp sets called Special Delivery, this set has some cute critters and lots of mail related small images, I choose some letters in different sizes and a little birdie to create my card today. 


After I colored my little birdie, I cut and adhere all the small stamped images with 3D Foam, I also adhere some small sequin stars and I stamp the sentiment to a banner.


Now is your turn, look for those small stamps on your stamp sets and create quick and fun cards!


Have a wonderful day!


Craftin Desert Divas Supplies:


 fancy frame dies


 cracked pistachio oxide ink


Tuesday, April 17, 2018

Embossed Foiled Card Accents/Brutus Monroe and ThermOweb Week!!


Hello Friends, Thank you for stopping by my blog for another Wednesday Quick Tip using Brutus Monroe stamps and products, this week is special because this week Brutus Monroe is collaborating with ThermOweb, and both Design Teams have created amazing projects featuring lots of techniques and products....  You can find the blog hop at the Brutus Monroe Blog.   My projects today will have lots of shine and foil... I went a little overboard and have many cards to share with you!  Today is all about sets of cards... because we always need a THANK YOU card on hand!!!


CARD DETAILS: 

Have you ever wonder if you can foil embossed cards? well the answer is YES!!! For my cards today I did a little experiment and love the end result.... 
I started embossing several white card bases with some of my favorite Brutus Monroe Embossing Folders, I then ink blend the embossed white card bases with Oz Surface ink.
With a sponge I put a thin amount of transfer gel onto the panels and let them dry.  I really try to get into the embossed areas to have a smooth foiled background.  After they were dry I run them into my Minc Machine.


After I created the foiled embossed panels I cut them and adhere them to a white panel and then to a black card base, I love the look of them, on some designs you can see the Oz surface ink color, like on the wild cherry foil and with other foil colors the ink blends perfect with them.  I used Jade Foil and Gold Shattered Glass.


I added the thank you sentiment in black to match the card base.


Aren´t this just beautiful!!! I love the simple, yet elegant look of the emboss and foil......


For my next project I used Clear Designer Toner sheets, this are beautiful to create all kinds of cards....I don't know you, but I love all my foiling sheets that I don't want to waste any of it so for my next set of cards I used both the foiled clear toner sheet and the remaining.


To adhere the Foiled clear toner sheets and remaining foil to the card base I used a little of the Brutus Monroe craft glue in the top and bottom, and to cover the glue, I cut a small strip of cardstock and glue it on top of the foiled pieces.


I did the same thing with the rest of the cards and for the thank you sentiments I used ThermOweb toner sheets to create the different color thank you dies.


I had so much fun creating this two sets of cards, that are now ready in my stash to give to someone special!


To get a chance to win this amazing prize all you have to do is visit the Brutus Monroe Facebook page, like it and leave a comment.  You can also enter on the ThermOweb page!!!


Now is your turn, create amazing projects with Brutus Monroe and ThermOweb products and give some fabulous shine to all you do!!!  I hope you can be inspired with my projects today!! Don´t miss anything and hop along with us!!!

WALESKA GALINDO ----You are here

Have a wonderful week!


Brutus Monroe/ThermOweb Supplies:
(Clickable Links)